


Contents
- Introduction, setup, and use
- System requirements
- User Guide contents
- Features overview
- Quick Start Guide
- Step 1 – Sign up or register for a TVU Producer account
- Step 2 – Start your Producer session
- Creating a program
- Starting and stopping a live transmission
- Producer Interface overview
- Management Center and Cloud Recording
- Input Source Recording
- Base operation
- Adding sources to your production
- Source selection types
- Adding a Clip Player source
- Breakout Clip Player feature
- Adding IP video
- Adding a Partyline source
- Customizable Multi view feature
- Custom view and border feature
- Using the output feature
- Adding a social media account
- Vertical mode outputs in Producer
- Other IP outputs
- Video publishing
- Using the overlay feature
- Taking a source live
- Switching and transition features
- Stopping a live transmission
- Audio control
- Using the PIP feature
- Input Source Recording feature
- Management Center tab functions
- Replay operations
- Clip player feature
- User Management
- Time remaining indicator
- Advanced Audio Mixer
- Captioning feature
- SCTE 35 feature
- Monitoring and Diagnostics
- PTZ Control and VLAN configuration
- Buffer feature
- Auto Failover feature
- Purchasing TVU Producer
TVU Producer Quick Start User Guide

TVU Producer is a ground-breaking live cloud production platform combined with video conferencing and social production. All you need is a PC and Chrome browser to operate TVU Producer.
Chapter 1 – Introduction, setup, and use
TVU Producer requires a subscription activation by registering online or from TVU Support (refer to Purchasing TVU Producer for more information). TVU Networks recommends logging in to your TVU Producer account using your credentials and familiarizing yourself with the user interface, features, and functions.
TVU Producer overview
TVU Producer allows multiple, live, and synchronized IP video streams from professional cameras, mobile devices, or cloud storage. Video streams are seamlessly switched and combined with graphic overlays. As a result, the operator can simultaneously output video clips to multiple destinations, including TVU Grid for traditional workflows and CDN or social media destinations.
TVU Producer – How it works
The TVU Producer workflow is defined as follows:
- Create and manage live productions or programs with the Producer Workbench
- Obtain a live video ingest
- Upload local video and Assets
- Add graphic overlays and audience data
- Perform real-time switching, replays, or publishing to a CDN/social media
- Monitor your production
System requirements
- A laptop with an i7 processor or above with 16 GB memory, and a minimum screen resolution of 1920 x 1080
- Internet bandwidth – 32 Mbps (download), 10 Mbps (upload)
- Windows 10 or later, Mac OS 11.0 or later, iPad Pro 12.9 or later (using a Chrome browser)
User Guide contents
This TVU Producer Quick Start User Guide provides a general overview of each feature and instructions for setting up and using TVU Producer.
This user guide provides details for the following topics:
- Setting up a TVU Producer account
- Logging in to TVU Producer
- TVU Producer Workbench Web interface overview
- TVU Producer Web interface overview
- TVU Producer base operations – How to use TVU Producer
- Purchasing a TVU Producer
Features overview
TVU Producer’s robust cloud-based service comes with the following features:
- New light or dark theme selector – Allows users to switch from dark to light mode. The dark mode is the default.
- Output Buffer – The Output Buffer feature allows users to upload and configure a secondary video for Censorship purposes.
- Auto Failover – Use the Auto Failover feature to configure a primary and secondary slot if the primary video slot stops playing.
- Live IP video switcher – Up to 8 live video streams can be switched seamlessly in the cloud with precise frame accuracy from the TVU Producer interface. Producer supports four or eight live video sources, 1 EXT IP source, and one local video clip player source and custom source.
- Transitions – A Transition is a special effect in the live streaming show when you connect or switch from one live feed or scene to another live feed or new scene during a live production. There are three transitions supported in TVU Producer: Dissolve, Iris in, and Iris out.
- Clip player feature – The new Clip Player feature in TVU Producer is enhanced with support capabilities for all of the local clips’ basic and advanced operations, including playlist and audio file support.
- Works with any standard IP source – TVU Producer is designed to work with virtually any IP video source and integrates with TVU Anywhere, TVU One, TVU Grid, TVU Partyline, TVU Replay, and TVU RPS as well as support for any standard IP video stream including SRT, RTP, RTMP, HLS, HTTP, UDP, etc.
- Workbench – Delivers more functionality to allow users to quickly create and manage live production shows or programs. A user can define or choose configuration options for a live production and assist in creating a live streaming workflow.
- Partyline / Video conferencing – Partyline is the next-generation IFB/ video conferencing solution that allows controllable multi-way communication between the event director, camera or graphics operators, audio engineers, and viewers behind the scenes using TVU Partyline. Producer allows you to add a Partyline participant as a source. Producer can also send its PGM as a video return to Partyline.
- Advanced audio mixer – Advanced Audio Mixer is a dedicated separate interface built for audio operators to mix audio for the program separately from video and graphics operation.
- Multi-audio channels – Support for 2, 4, 6, or 8 embedded output audio channels can be configured in the Workbench Settings window for your Producer project. The Audio mix option in Producer allows up to 4 pairs of audio channels to be configured by selecting the Audio Output Pair Control feature in the Audio mix panel. This feature is useful for multi-language outputs. A user can independently adjust the volume of the audio output channels assigned to each pair. The volume for each pair of output channels can be adjusted or muted using the Master output level control slider in the Audio mix panel.
- Video publishing – Publishing in a landscape and vertical mode, TVU Producer helps push live and recorded content to social media or virtually any CDN and video cloud service workflow in a landscape and vertical mode (9:16 aspect ratio). The customers can now directly and easily broadcast their live content to Facebook, YouTube, Twitch, Periscope (Twitter), and Yizhibo. Customers can also push their program stream to their CDN or send it out to Grid, where they can distribute the content with their partners.
- Integrates with TVU Anywhere – TVU Producer integrates with TVU Anywhere. Any iOS, Android, or macOS device user can quickly download the TVU Anywhere application and be added as a live video source.
- Multi-channel graphic overlays via Singular.live and Viz Flowics integration – In the TVU Producer interface, users can upload any PNG graphic, including an alpha channel and transparency, as an overlay for the video output. TVU Producer supports dynamic overlays using the Singular.live app on multiple channels.
- Instant Replay – The Replay feature allows users to rewind and replay a critical moment that happened a few minutes ago. With a simple button click, the TVU Producer allows you to replay the selected frames and allow users to see a double take of the best plays or moments. This increases the value of your live shows.
- TVU Replay integration – Create playlists within TVU Replay and bring them into the dedicated thumbnail preview within TVU Producer as clips instantly and ready to be produced.
- ISO recording – With the ISO Recording feature enabled, you can record each camera source or input source independently of other feeds and final program output. ISO feature can assist in many ways, including fixing live production mistakes and creating new content with customized graphics for your mobile and social media audiences. This feature assists in enhancing your revenue opportunities for all digital assets.
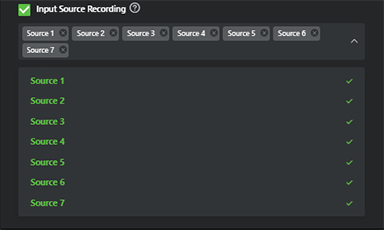
- Input Source Recording – The Input Source Recording checkbox can be checked in the Workbench Settings menu. When enabled, you can select what input sources will be recorded.
- PGM Recording – This checkbox in the Workbench Settings menu replaces the previous VM recording service. When adding a new source in Producer, The “Recording Service” is now an option. The live recordings completed by your VM are sent to an external recording service. Your recordings display in the Cloud Record tab’s Remote Record File list. You can add markers to your recording, upload them to the Remote File list, or download them to your local drive.
- Customizable Multiviewer – The Customizable Multiviewer feature enhances the current Multiview feature within Producer. This feature can create any multi-view sources, including quad-view and dual-views.
- SCTE 35-based dynamic ad insertion – With TVU Producer, customers can perform a dynamic ad insertion for a Live broadcast by collaborating with third-party ad services. A new feature is available to manually insert SCTE slice points or triggers in Producer to signal an ad-insertion in the transport stream. SCTE pass-through is also supported.
- Captioning – The Captioning feature provides the capability to deliver live and closed captions into the program output in TVU Producer. This enables our customers to automatically add captions to the outgoing live feed from TVU Producer.
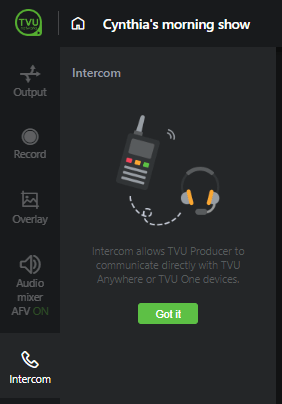
- Intercom – The Intercom feature is still available for legacy devices. The Intercom feature allows a producer to communicate with a cameraman using TVU Anywhere or a TVU One transmitter. The intercom feature has been replaced with Partyline, the new collaboration tool that works with TVU Producer.
- Basic Collaboration – The Basic Collaboration feature allows the TVU Producer user to create a live show and share the live show with the production team members. This feature allows for a collaborative effort between production team members to produce and publish a live show.
- Monitoring and diagnostics – The Monitoring and diagnostics feature provides a dashboard that displays the key parameters to indicate your IP feed health coming to all input sources and the health of the outgoing live stream going into each destination. In addition, the user can view Producer timeline messages and diagnostic errors.
- RTMP pull/push – The RTMP push/pull features allow users to add RTMP sources from ext encoders, webcams, or Go pro devices with Producer.
- Custom view and border – The custom view and border feature allows a user to add multiple custom source views with or without borders to Producer.
- Clear and remove overlay features – The clear and remove overlay features allow a user to clear all overlays from the Preview window and remove all overlays from the Program window by clicking a button at the bottom of each window.
- Vertical mode – The vertical production feature allows users to set up a Producer instance in 9:16 production mode. This feature is enabled in the Workbench Settings menu. This feature allows output from Producer in a true 9:16 vertical orientation.
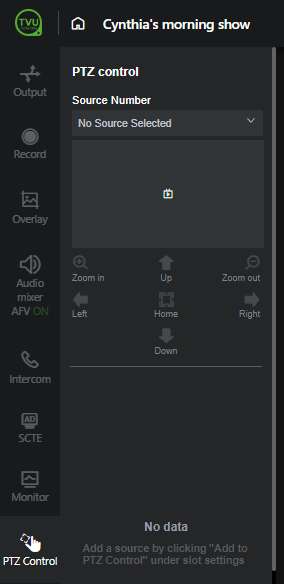
- PTZ Control – The PTZ camera control feature is integrated into the TVU Producer user interface software to give users a single interface to control their PTZ cameras.
- Offline setup – Producer allows users to set up a production without starting the Producer program.
Chapter 2 – Quick Start Guide
Step 1 – Sign up or register for a TVU Producer account
To sign up or register for TVU Producer, complete the following steps:
Notes:
- To purchase TVU Producer, go to “Purchasing TVU Producer” for more information.
- Open a web browser window and enter: https://www.tvunetworks.com/products/tvu-producer/
- Click the green Sign up/Login in the page’s top right corner.
- The Producer Sign-in pop-up window displays.
- The Sign-in page displays.
- Enter your Name, email, and Password. Click the Agreement check box and click Get Started now.
- Check your email and enter the six-digit code, then click Verify.
- The TVU Producer Workbench opens. Continue to “Creating a program.”
Step 2 – Start your Producer session
To Sign in to a TVU Producer account, complete the following steps:
- Open a web browser window and enter: https://producer.tvunetworks.com/producer/
- Click the green Sign up/Login button in the page’s top right corner.
The Producer Sign-in pop-up window displays.
- Enter the following information:
User ID: email address
Password: Enter your Password
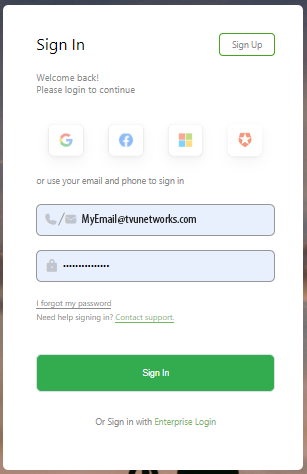
- Click Sign In. The Producer Workbench user interface displays.
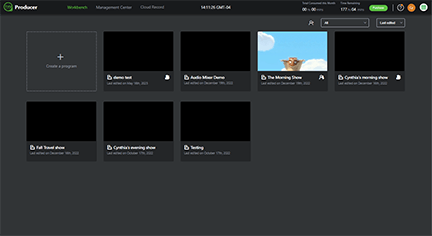
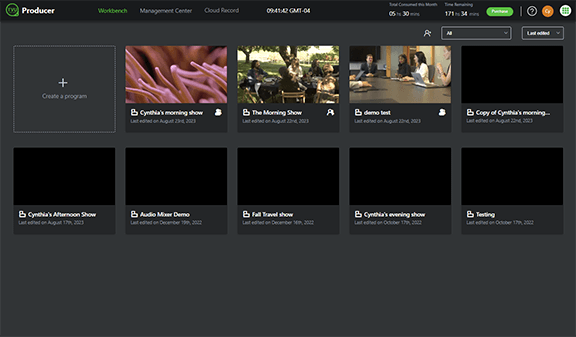
Creating a program
To create a program, complete the following steps:
- The Workbench tab displays by default. Click + Create a Program.
- In the Create a program pop-up window, Enter a Program name for your production and click Next.

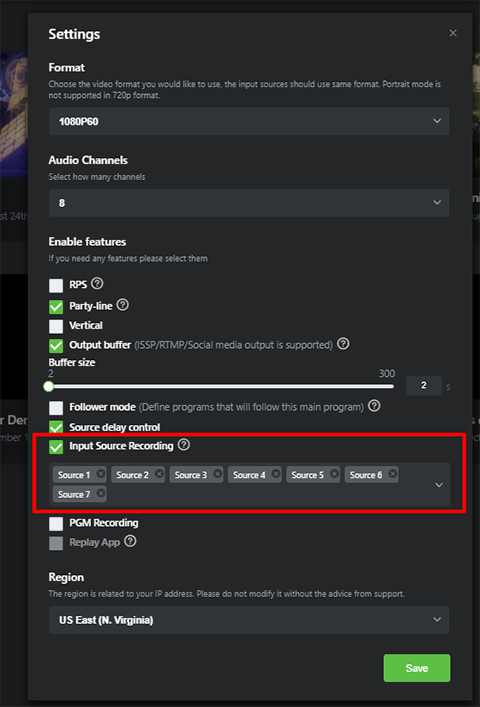
- The Settings pop-up window opens.
- Choose the video format you would like to use from the Format drop-down menu.
Note: If you choose a specific Video Format for the Live Show, all your input feeds need to match with this program format for your live switching to be accurate. Please ensure all your input video formats are one and the same. You can separately choose your Output format when you want to go live.
- Click the Audio Channel drop-down menu and select 2, 4, 6, or 8 output channels for your Producer project to enable the multi-channel audio feature.
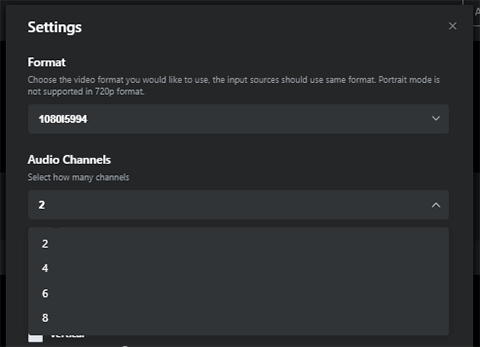
- Select the desired feature checkboxes for your live production, select a Region, and click Save.
- RPS: Whenever the RPS feature is enabled, the first 6x slots of your production will be reserved as RPS sources only.
- Partyline: Enabling this option automatically forces all TVU Anywhere to join a party. Producer PGM will be in Video Return by default, and UI previews will use RTIL stream coming directly from the device.
- Vertical: Enable this feature to allow Producer to output your source in vertical (portrait) mode.
- Output buffer: The Output Buffer allows a time buffer (up to 300 seconds) to be set between what is viewed in the Live Output Program and the actual video being encoded for output. (ISSP/RTMP/Social media output is supported)
This is primarily so the operator can censor the live source for any issues in the program (such as profanity). If an issue occurs, you have time to react and can switch to a replacement video/image. - Follower mode: Enable this feature to define programs following the main program. Use the Configure link to define which sources follow the main program. Choosing this feature means this production is the main production.
- Source delay control: Enable this feature to set a delay in ms for a producer source.
- Input Source Recording: Enable this feature to select which source you want to be recorded. You can find the recordings in “Cloud Record”->”Remote Recording.”
- PGM Recording: Enable this feature to allow recording functionality.
- Replay: Enable this feature to allow replay functionality. Replay is not a standard feature and must be enabled by TVU Support before it can be used. Contact support@tvunetworks.com for more information about the Replay App and testing the feature.
Note: The region is related to your IP address and is preset.
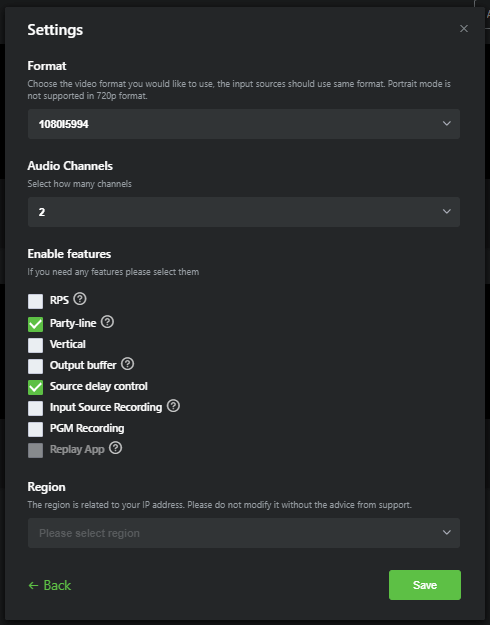
- Click Start to start your program in TVU Producer.
- To change a program setting, click the three dots “…” in the program window and click Settings. Make your changes and click Save.
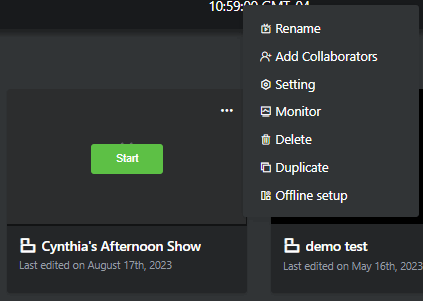
- Click the three dots “…” on your program window to view and select various program functions:
- Select Rename to change your program name.
- Select Add Collaborators to enable the Basic Collaboration feature. This feature allows the user to produce a live show by collaborating with production team members.
- Select Setting to reopen the Settings window and change your program settings.
- Select Monitor to open the Monitoring and Diagnostics feature dashboard.
- Select Delete to remove your program from Workbench.
- Select Duplicate to duplicate a program.
- Select Offline setup to set up your programming in offline mode.
Using the Basic Collaboration feature
The Basic Collaboration feature allows the TVU Producer user to create a live show and share the live show with the production team members. This feature allows for a collaborative effort between production team members to produce and publish a live show.
Note: The collaborator must have an active Producer account to participate.
To use the Basic Collaboration feature, create a program in the Workbench and complete the following steps:
- Hover your mouse over the program, and click the three dots “…’ in the program window.
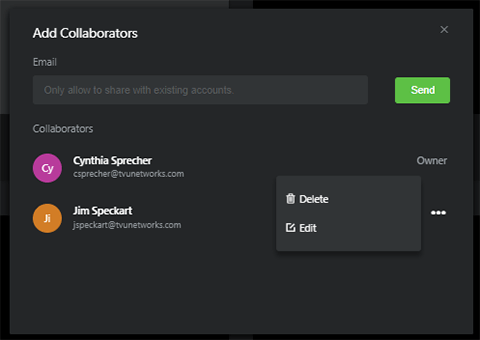
- Select Add Collaborators from the Program Settings menu.
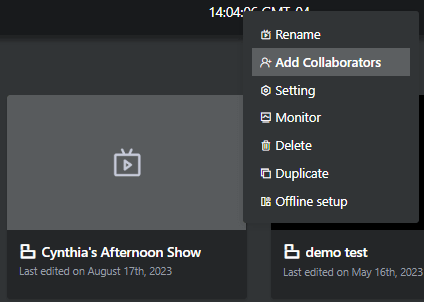
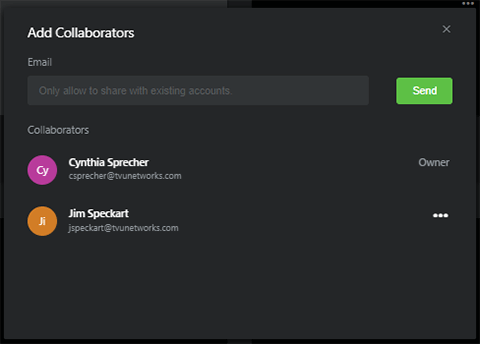
The Add Collaborators pop-up window displays.
- Enter your collaborator’s producer account email address in the Email field and click Send.
- The Collaborators are displayed in the Add Collaborators pop-up window.
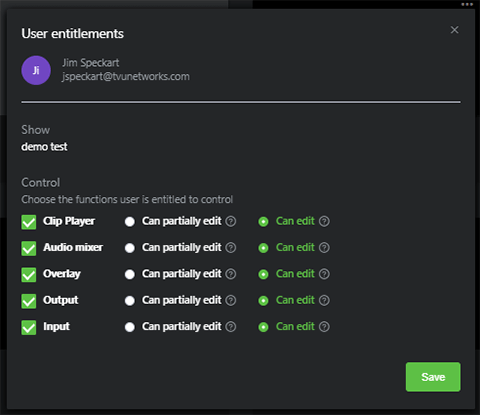
- The program owner can now choose the functions the collaborator is entitled to control by clicking the three-dot “…” icon and selecting Edit to open the User entitlements window.
- The program owner chooses the functions the collaborator can control in the User entitlements window and clicks Save.
- The collaborator can now open a browser window and log in to TVU Producer. The shared program and any previously created programs are displayed on the Workbench screen.
- The Producer user and collaborator are now ready to run the same program or live show.
Note: When a new program is shared with the collaborator by the primary Producer user, the collaborator does not have the option to share the program with other users. The primary Producer user controls that functionality.
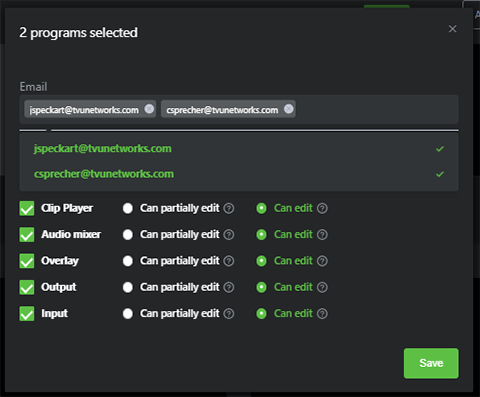
- To add additional collaborators to your production, click the collaborator icon in the top bar. The Collaborator icon turns green. Then, click the checkbox for each program you want to add.
- Make your selection from the drop-down menu. The default is All.

- In the User entitlement window, enter the added collaborators’ email address(es), select the functions you want them to control, and click Save.
Starting a live transmission
To start the TVU Producer instance to take your program live, complete the following steps:
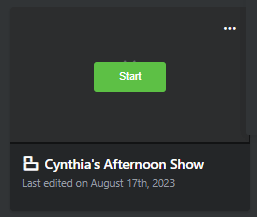
- Hover your mouse over a program you want to take live in the Workbench and click Start.
- The Initiating steps to launch the TVU Producer process begin.
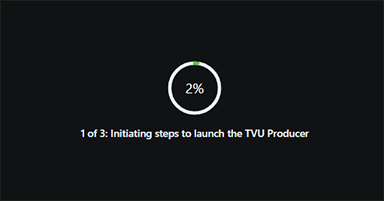
- Continue with “TVU Producer User Interface overview.”
- To stop the program, go to “Stopping a live transmission.”
Note: Programs that are started display “Running” under the program name in the Workbench tab.

Stopping a live transmission
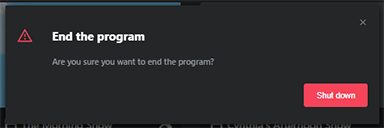
To stop your program’s live transmission, complete the following steps:
- Click the top left Home icon in the Producer interface to return to Workbench.
- Hover your mouse over the program you want to stop and click the power button icon.

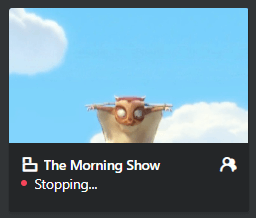
- The “End the program” pop-up displays. Click Shut down.
In the Workbench, the stopping program indicator displays.
Chapter 3 – Interface overview
This section describes the essential components of the TVU Producer user interface.
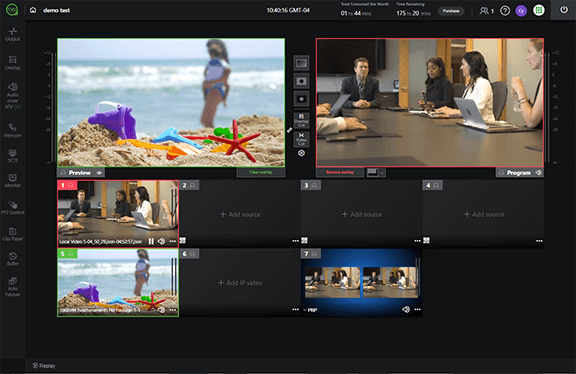
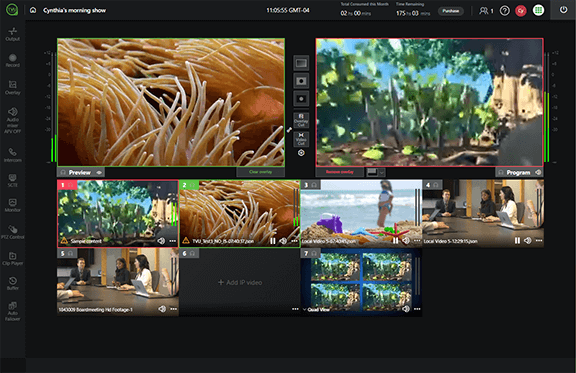
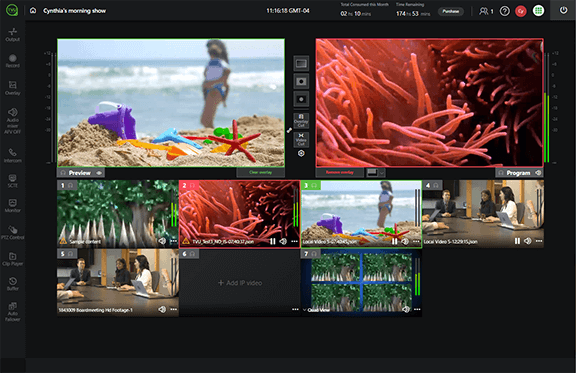
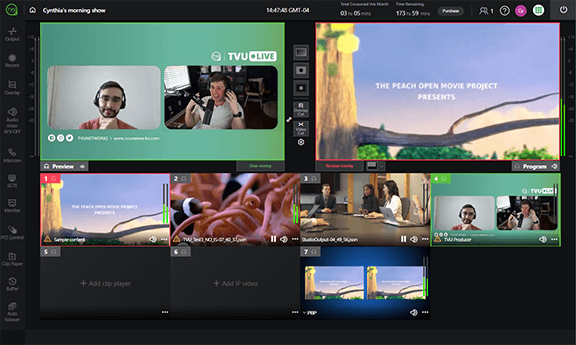
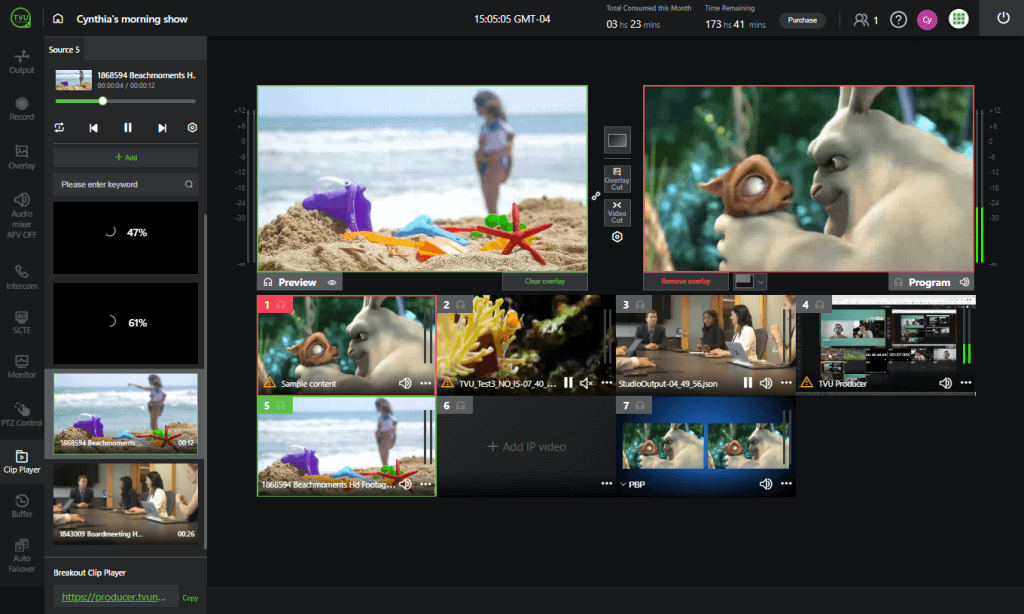
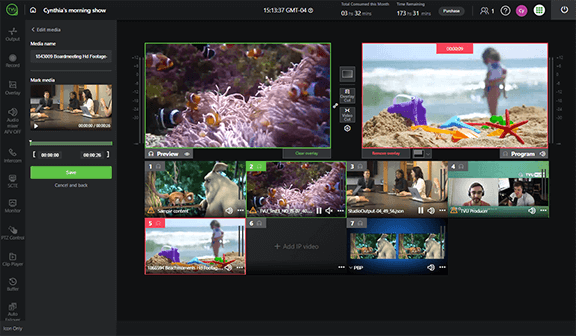
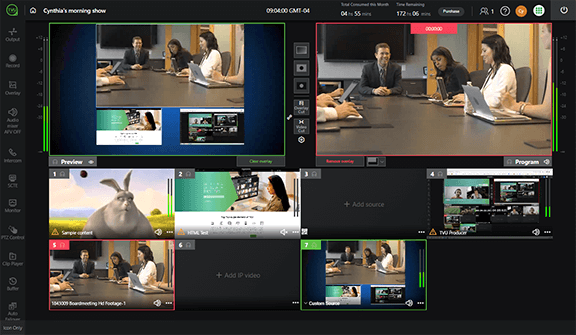
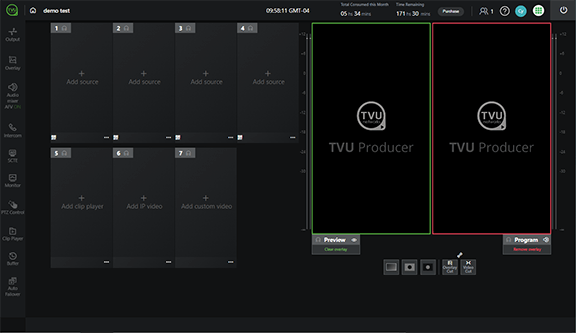
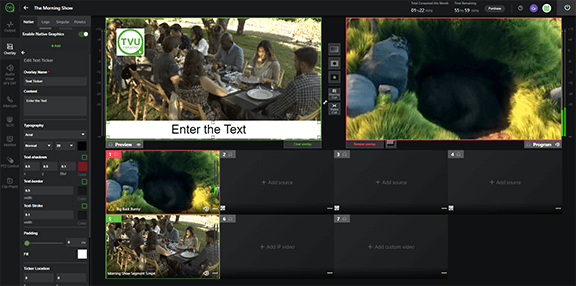
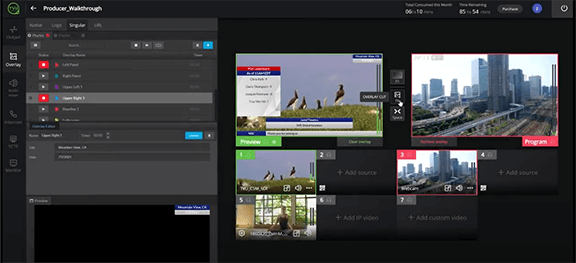
TVU Producer User Interface overview
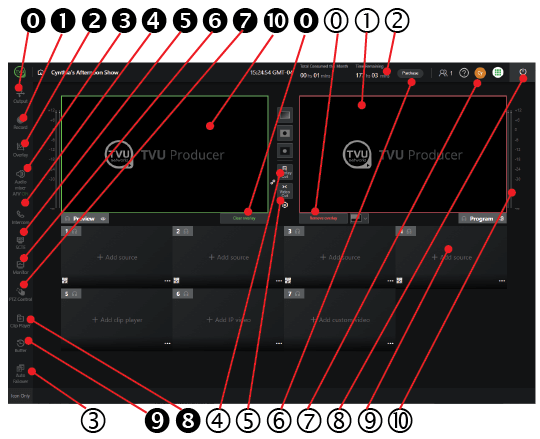
The Producer user interface displays the following functions and controls (reference number callouts as shown above):
0 – Output and Import: The Output feature allows users to output the newly produced live stream to desired destinations. These destinations could be a custom CDN or a Social Media destination such as YouTube, Facebook, or others.
Users can click +Add at the bottom of the Output to destinations panel to select a destination and import social media accounts, CDN, or Grid into their output.
These options enable users to authenticate their credentials to access desired social media destinations.
Notes:
1. For more information reference “Using the output feature.”
2. For more information about adding Sources, refer to “Adding sources to your production.”
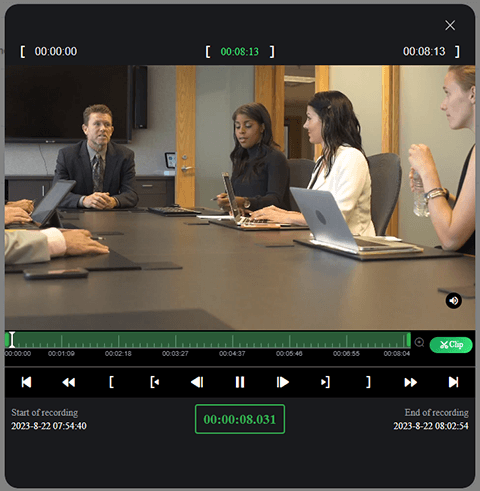
1 – Record: The Record feature allows users to create named clips with manual Mark in and Mark out points. These clips are saved to your cloud recordings folder in addition to the recording of the full program. Clip processing may take a few minutes to complete.

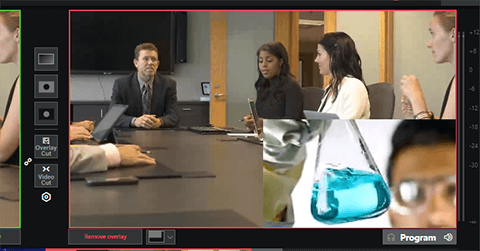
2 – Overlay: The Overlay feature allows users to add customized graphic and text overlays to their live video. These include native overlays such as logos and text from the appropriate tab. In addition, Producer features real-time overlays and data visualizations such as animations and transitions by integrating Singular.live sources from the Singular tab or Flowics sources from the Flowics tab. To access assets for this feature, click Overlay and select the Native, Logo, Singular, or Flowics, tab.
For more information reference “Adding social media accounts.”
3 – Audio mixer: AFV is enabled by default. When AFV is enabled, the audio follows the video when cut.
For more information reference “Audio control.”

When AFV is disabled, the audio selection menu displays. The operator can select one audio source channel from the menu.

4 – Intercom: The Intercom feature is now replaced with TVU Partyline, a new collaboration tool that works with Producer. The Partyline tool is used by TVU One and TVU Anywhere users to communicate with the Technical Producer in the studio. However, the Intercom feature is still available for legacy devices. The Intercom feature allows a producer to communicate with a cameraman using TVU Anywhere or a TVU One transmitter.
5 – SCTE: The SCTE 35-based dynamic ad insertion feature is available to manually insert SCTE slice points or triggers in Producer to signal an ad insertion in the transport stream. Also, SCTE pass-through is supported.

6 – Monitor: The Monitoring and diagnostics feature provides a dashboard that displays the key parameters to indicate your IP feed health coming to all Input sources and the health of the outgoing live stream going into each destination.


7 – PTZ Control: The PTZ camera control feature is integrated into the TVU Producer user interface software to provide users with a single interface to control the look and feel of their live productions.
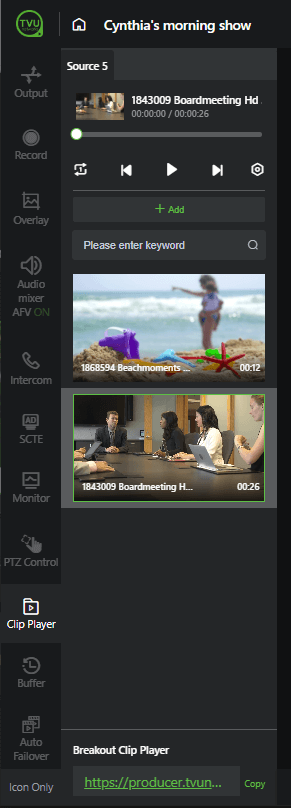
8 – Clip Player: Upload and view recorded clips using the breakout clip player viewer from a local drive or from the Cloud drive to use as source files in Producer. In addition, the clip player supports audio files. Copy the Breakout Clip player link and paste it into a new tab to view local clips.
9 – Output Buffer: The Output Buffer tab allows users to upload and configure a secondary replacement video if the primary video requires censoring. Set the Reaction time in the Buffer settings panel.

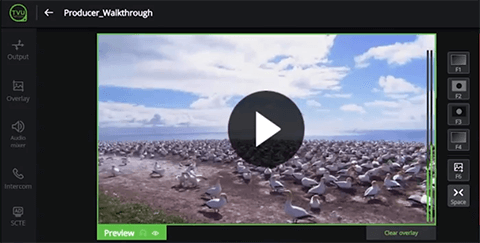
10 – Preview: The operator can confirm a selected source to go live within the top left Preview window outlined in green.
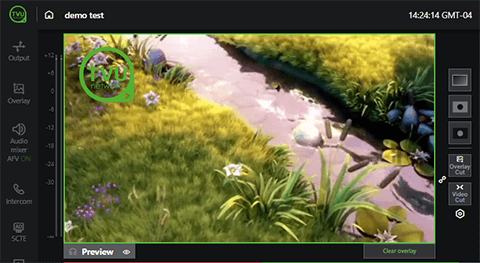
For more information reference “Starting a live transmission.”
0 – Clear Overlay: Clear all overlays from the Preview window.
O – Remove Overlay: Remove all overlays from the Program window.
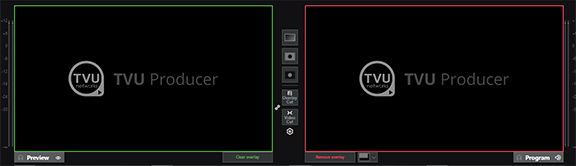
1 – Program: The Program window is the Live screen everyone can view. It is the top right Live screen outlined in red.
For more information reference “Starting a live transmission.”
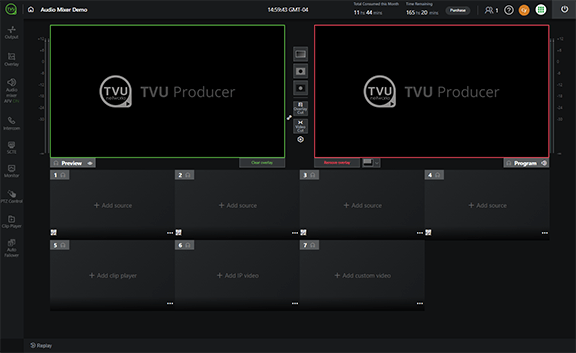
2 – Time remaining indicator: Your session timer is located next to the User Management drop-down menu, which displays the time remaining in your session. When you mouse over the time remaining, the expiration date for your session displays.
For more information reference “Time remaining indicator.”

Note: To stop your session timer, click the Power button to shut down the program.
3 – Auto Failover: Set up a primary video in slot one and a secondary video as a backup in slot two. Configure the time for failover in seconds.
Replay: The Replay button in the bottom left corner of the UI opens the Replay panel. The Replay feature allows users to replay and rewind a recorded video. When the green Rewind button is selected, users can select a portion of the recording to replay. Then, click the Replay button to replay selected frames.

For more information reference “Replay operations.”
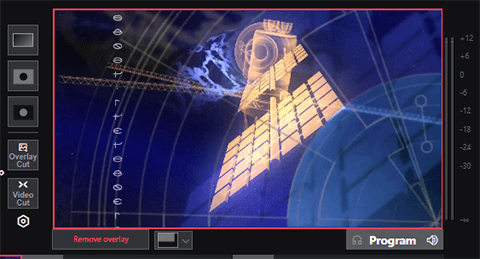
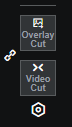
4 – Overlay Cut: Cut an overlay (F6) from the Preview window to the Program window.
For more information reference “Starting a live transmission.”

5 – Video Cut: Cut video (Space bar/button) from the Preview to the Program window. To cut the overlay and video together, click the link icon.
For more information reference “Starting a live transmission.”

6 – Purchase: The Purchase button lets users purchase Producer securely online using PayPal. Click the Purchase button to display TVU Producer and TVU One products and review the latest pricing.
To purchase a TVU Producer TVU Oneage, go to “Advanced Audio Mixer” for more information.

7 – User management: The User management menu contains Language, a Shortcut list, Theme, and Sign-Out selections.
For more information reference “Time remaining indicator.”
- Language selection: To translate the Producer interface into English or Chinese, click the User management drop-down menu and select English or Chinese.
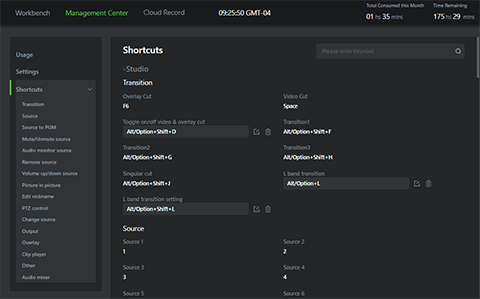
- Shortcut List: Select the Shortcut list in the User Management menu to display a list of keyboard shortcuts in the left panel you can use.
- Theme: Select Theme in the User Management menu to change from the dark to light interface.
- Sign Out: Select Sign Out in the User Management menu to end your session.
For more information about the timer in the top navigation reference “Time remaining indicator.”
8 – Power: The Power button stops your session timer and closes the program.
9 – Source windows: A green border around the source window indicates that the video is in the Preview mode. A red border means that the video is Live in the Program window. Click a source window once to cut it into the Preview window.
For more information reference “Starting a live transmission.”

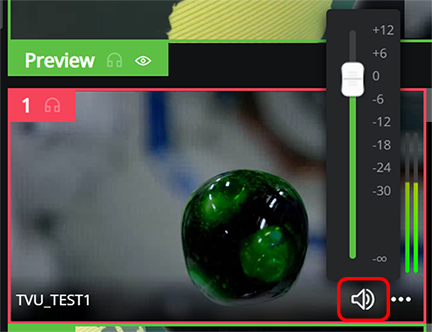
10 – Audio indicator bars: The Audio indicator bars are located to the right of the Program and to the left of the Preview windows. Audio levels for both windows can be monitored visually from the Producer user interface.
Management Center and Cloud Recording access
If you are in Producer, click the Home icon in the top left panel to return to Workbench. Click the Workbench link on the top-left panel of the Workbench page to access the Management Center and Cloud Record pages.
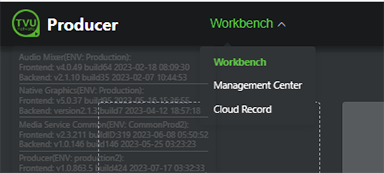
Management Center
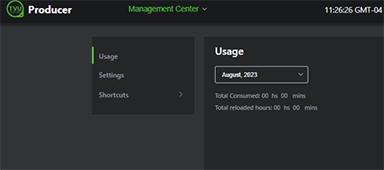
The Management Center menu provides access to Usage details, Settings, and the keyboard Shortcuts configuration page.

Usage: Select Usage to view your consumed and reloaded hour usage.
Settings: Select Settings to:
- Enable email notifications.
- Enable Auto Shutdown to automatically shut down your production when you are away from producing more than 30 minutes without streaming.
Shortcuts: Select Shortcuts to configure keyboard shortcuts, select, and use them in your Producer program.

Cloud Record
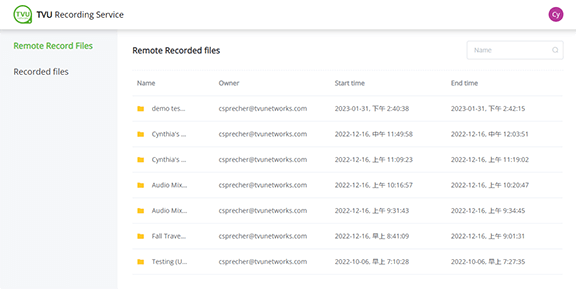
Recorded files: On the Workbench page, click the Workbench link in the top panel and click Cloud Record, the TVU Recording Service page opens in a new tab. Select Remote Recorded Files or Recorded files from the left panel to view a list of recorded files. Mouse over the file and click the green Download button to save the file to your local drive.

Input Source Recording feature
The Cloud Record tab in the Workbench top navigation contains the Recorded file and Remote Recorded file lists:
- The recorded file list contains locally recorded files.
- The Remote Recorded file list contains files from the Remote Recording service. These files can be marked, clipped, and saved as a new input source .json file, which outputs from Producer as an HLS stream.
To enable the Remote Recorded file editing feature:
Open the program Setting menu in Workbench and click the checkbox to enable Input Source Recording to select your sources.
To choose the input source recording in producer:
- Click +Add Source and select Recording Service.
- Select a recording and an input source .json file to take live.
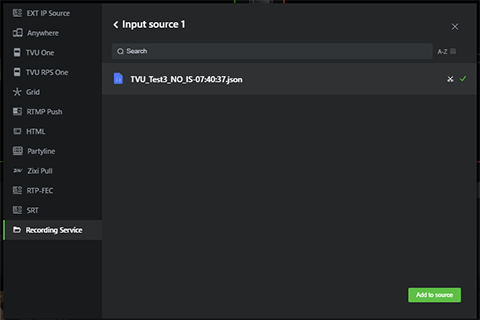
- Click the Add to Source button.
The recordings automatically start with a live source that is in production. You can access the live recording, add markers, and save it as a new clip while still live:
- Click the Cloud Record tab in Workbench.
- Click Remote Record Files in the left panel.
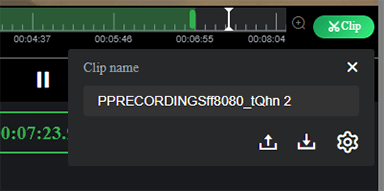
- Click a json file, then click the Clipping button in the Action column.
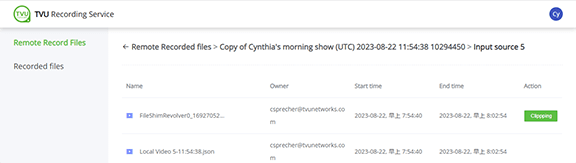
- The Clipping iFrame displays. Set the Mark in and Mark out points and click the Clip button.
Recorded files: Click Recorded files from the user management menu to view a list of recorded files. Mouse over the file and click the green Download button to save the file to your local drive.
In the event that the user management menu does not include the Recorded files selection, click the back button in the top left of the screen to return to Workbench. Click the Cloud Record tab in the top navigation to access the Recorded file and Remote Recorded files menus.
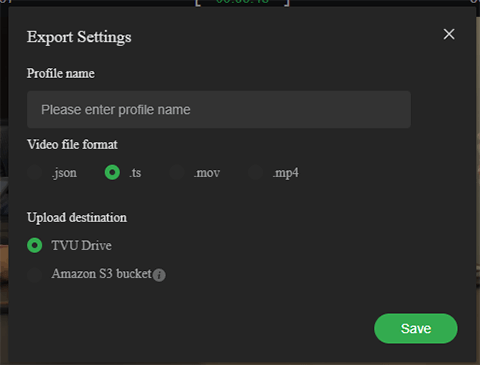
- To change your file Export settings, click the Settings gear, Enter a Profile name, and choose a Format. Click Save when finished.
- Enter a Clip name. Choose the Upload or Download icon.
- The success message displays. The new clip displays in the Remote Records Files list.
Chapter 4 – Base operation
This section provides step-by-step instructions on using TVU Producer features and functions.
Note: How to videos related to this Quick Start guide are available in the Product tips section. Expand the Support menu in the www.tvunetworks.com main navigation menu.
Adding sources to your production
By default, TVU Producer supports six input stream sources: 4 live sources, 1 IP video, and 1 local video source. Also included is the option to customize a video source.
When using the advanced configuration, TVU Producer supports up to 11 sources: 8 live sources and 3 additional sources. This feature may come with an additional cost and is enabled for subscribers
who opt for this feature.
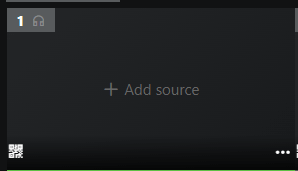
Source windows below the Preview and Program windows display as a black box when a source is absent.
To add a source to your production, complete the following steps:
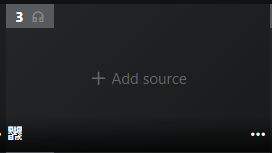
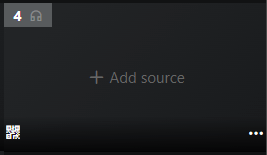
- Click the Plus + Add Source icon in the source window.
The source selection dialog window opens when you click the + Add icon. There are several source types you can add to your production.
Note: For information about adding a specific source selection type, continue to “Source selection types.”
- Select one of the source types in the left panel.
- Select an available source and click the green Add to source button.
- When you select a source type, a list of sources displays in the right panel. Click to highlight and choose the desired source, as shown below.
Your source selection displays in the source panel.
- To remove a source from the source panel, click the three-dot ‘…‘ icon in the source panel and select Remove.
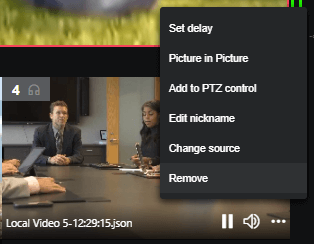
Source selection types
This section describes the following source selection types you can add to your TVU Producer production from the source window panel. The source, preview, and program windows feature a headset icon in the top left corner of each window that allows a user to turn monitoring on and off. For more information about the monitoring feature, refer to “Monitoring and Diagnostics feature.”
TIP: Product tip videos are available for adding source types to your Producer production at https://www.tvunetworks.com/ tvu-products-tips/.
- EXT IP source
- TVU Anywhere
- TVU One
- TVU RPS One
- Grid
- RTMP Push
- HTML
- Partyline
- Zixi Pull
- RTP-FEC
- SRT
- Recording Service
TVU One source selection
To select a TVU One source, complete the following steps:
- Click + Add source in the source window.
The ‘Add TVU One source’ window opens.
- Click TVU One in the left navigation menu.
- Select a source from the ‘Add TVU One source’ list and click the Add to source button.
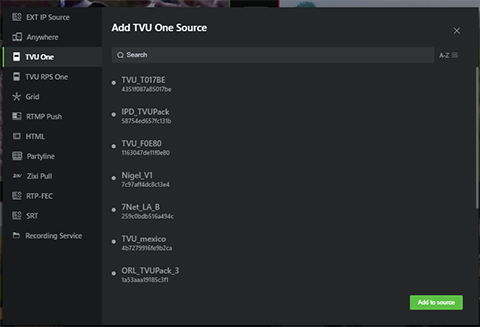
The selected source displays in the source window.
- After you add a source, click the source window to move it into the preview window.
- To add more sources, repeat the process.
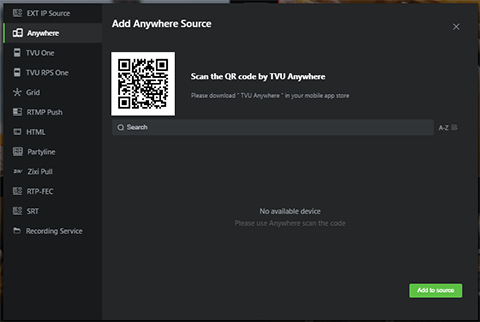
TVU Anywhere source selection
There are two methods to add a TVU Anywhere source:
- Click and scan the QR code on the source preview window.
- Click +Add Source on the source window.
To select a TVU Anywhere source using the +Add Source method, complete the following steps:
- Click + Add Source in the source window.
- Select Anywhere in the left panel.
- Scan the QR code in the source window.
- To use the TVU Anywhere app, open your TVU Anywhere app and click the Scan icon.
The Scan screen displays.
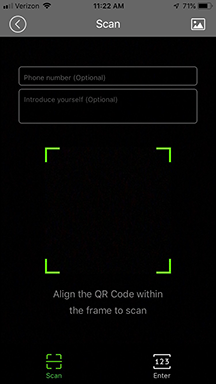
- Place the app over the Token code, centering it over the green frame. Then, wait a few seconds to auto-scan or press the Scan icon to capture the Token code.
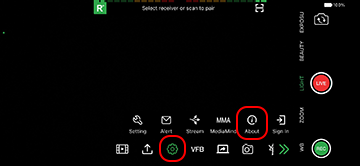
- Tap the Gear and About icons in the function bar to confirm the pairing.
- Locate and select your source from the ‘Add Anywhere Source’ list, or scan the QR code with your TVU Anywhere app and click the Add to source button.
- Click + Add Source in the source window.
The source selection dialog window opens.
- Click Anywhere in the left navigation menu.
- Select a source from the ‘Add Anywhere Source’ list, scan the QR code with your TVU Anywhere app, and click the Add to source button.
The selected source displays in the source window.
- After you add a source, click the source window to move it into the preview window.
- To add more sources, repeat the process.
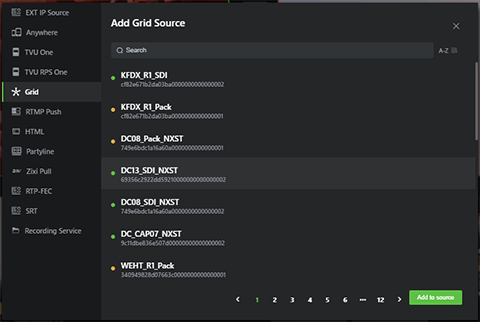
TVU Grid source selection
To select a Grid source, complete the following steps:
- Click + Add source in the source window.
The ‘Add Grid source’ window opens.
- Click Grid in the left navigation menu.
- Select a source from the ‘Add Grid source’ list and click the Add to source button. To add a new Grid source, click the +Add button and select a new Grid source from the list.

The selected source displays in the source window.
- After you add a source, click the source window to move it into the preview window.
- To add more sources, repeat the process.
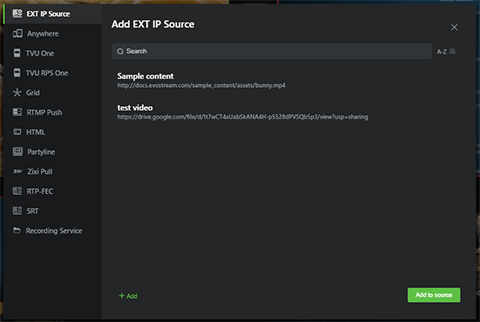
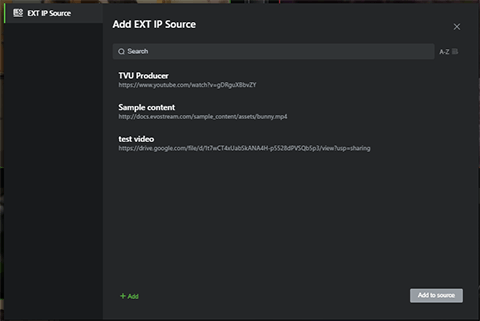
EXT IP source selection
EXT IP sources are output to social media accounts, such as an IP stream from a standard internet source using the https, rtsp, issp, or other formats.
To select and output a source to a social media account, complete the following steps:
- Click +Add source or QR code in the Add Source window.
The source selection dialog window opens.
- Click EXT IP source in the left navigation menu.
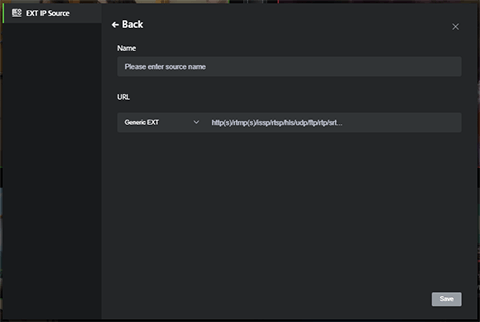
- To add a new Generic EXT source, click the +Add button. Type in a description and an IP address or URL of the stream, and click Save.
- To add a YouTube or Generic EXT stream, click the dropdown menu in the URL field and select YouTube or Generic EXT. Then, enter the URL or IP address of the stream and click Save.
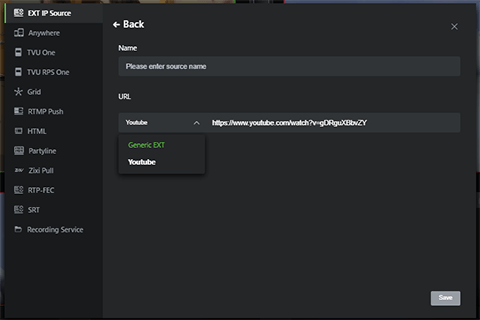
- Select your new source in the Add EXT IP Source list and click the green Add to source button.

The selected source displays in the source window.
- After you add a source, click the source window to move it into the preview window.
- To add more sources, repeat the process.
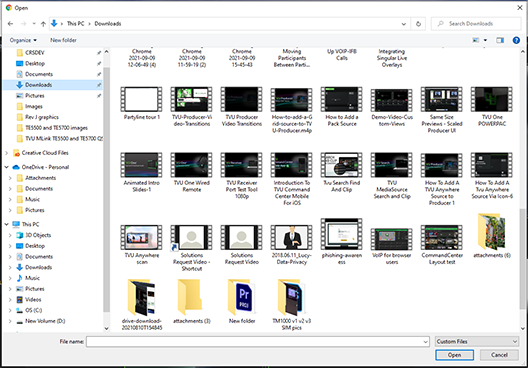
Adding a Clip Player source
To select a local video source, complete the following steps:
- Click + Add clip player in the (5) source window.
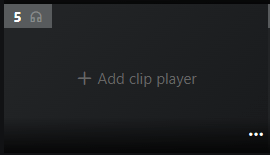
The Clip player file panel opens.

- To add a local clip, click the +Add button and select From computer or From Cloud Drive.
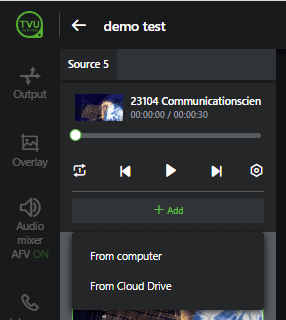
- To upload a local clip, browse and select a file and click Open. Your clip is displayed in the clip panel. If you select a file from your cloud drive, select the file and click the Add button. Your video upload progress displays in the clip panel.
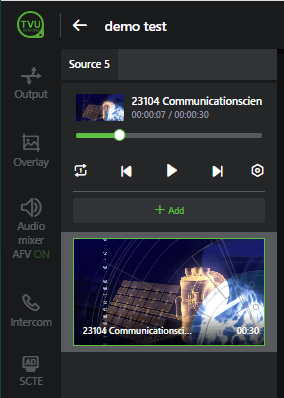
- Click on a source from the clip panel. The clip displays in the source window.
- Choose how you want your clip to play using the control bar in the panel. Click the source window to move the clip into the preview window.
- To use the mark-in and mark-out controls to edit your media, hover over the top of the image and click the Edit icon. To preview your edits, click the Play icon, then click Save to save your edits.
- Click the source window to move the local clip into the preview window.
- To add more local clip sources to the clip panel list, click the +Add button. A local file window opens. Select a local clip and click Open.
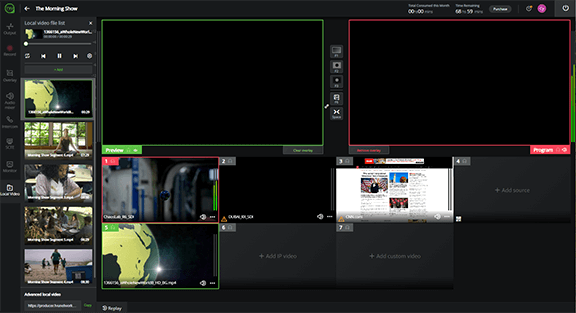
Breakout Clip Player feature
When you use the Breakout Clip Player, you can arrange and activate a list of local clips as a single source in Producer. In addition, the TVU Clip Player tab includes the Edit Media panel to perform Advanced local video edits.
To use the Breakout Clip Player feature, complete the following steps:
- Add a list of local videos to the Local video file list. To add a custom video, click +add and select From computer or From Cloud Drive. Select a local file and click Open. If you select a file from your cloud drive, select the file and click the Add button.
- At the bottom of the Breakout clip player file list panel, click Copy below Advanced Local Video.
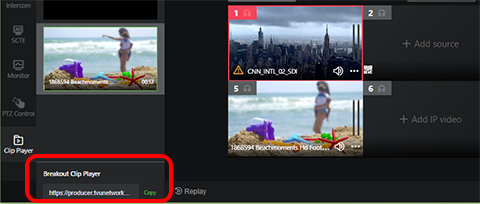
- Open a browser window, past the URL in the address bar, and press Enter. The TVU Local clips tab opens.
- To add an additional video, click +add local clip button and select Custom Upload. If you select From TVUDrive, you will access your TVU Cloud storage assets.
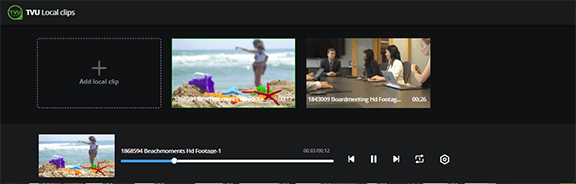
- In the browser window, select a desired video and click Open.
Note: During this process, the screen stays blank until the video uploads.
- The Clip Player tab allows you to edit the file name and add mark-in and mark-out points to a media file. To perform advanced local media edits, hover your mouse over the top of the clip and click the Edit icon.
The Edit media panel opens on the left side of the window.
- Use the Mark in and Mark out controls to edit your media. To preview your edits, click the Play icon, then click Save to save your edits.
- To play out your local file selections, you can select and drag a clip into a desired order to rearrange the clips.
- Click a source thumbnail to select it and activate it as the local source in Producer.
- Click the settings icon at the top-right of the source window to open the Auto play toggle, Cut PGM to PVW toggle, and the Play from the mark in toggle controls for a selected source.
Note: Autoplay is ON by default. Disabling autoplay will stop the program from playing.
- Autoplay – Plays the video from the mark-in point when selected as a source.
- Cut PGM to PVW – Automatically cuts the program away from the local video source when the local video file ends.
- Play from the mark-in – Enables the customized Mark-in and Mark-out points you set for a local video.
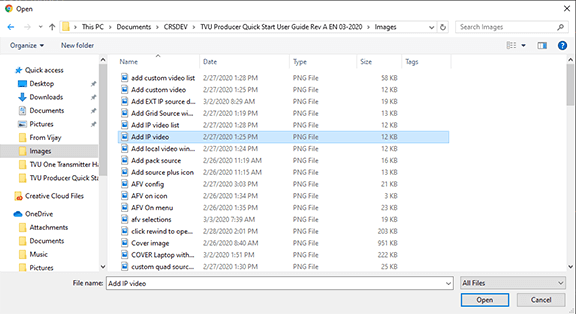
Add IP video
To select an IP video source, complete the following steps:
- Click the + Add IP video source window.
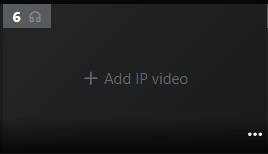
The ‘Add EXT IP Source’ window opens.
- Select a source from the list and click the Add to source button.
- To add a source to the EXT IP Source window, click the green +Add button.
- The EXT IP Source window opens. In the Name field, enter the Name of the source and, in the URL field, the URL. Then, click Save.
- Select the new source in the ‘Add EXT IP source’ list and click Add to source.
- After a source is selected and added to the source window, click the source image to move it into the preview window.
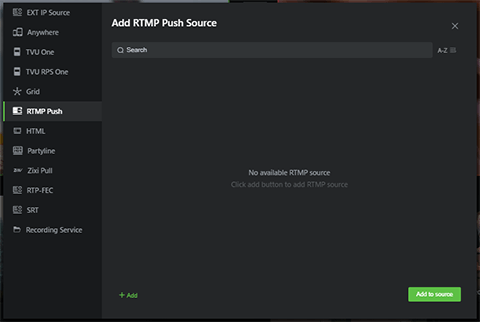
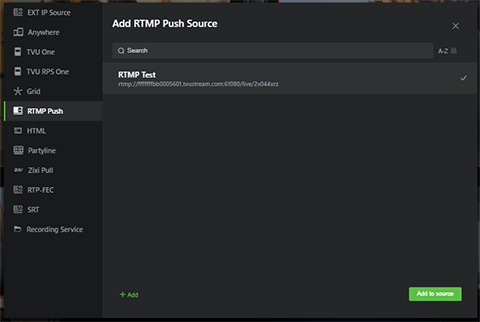
Adding an RTMP push/pull source
To add an RTMP push video stream into Producer, complete the following steps:
- In the Producer User Interface, click +Add Source.
- In the Add EXT IP Source pop-up window, Click RTMP Push and click +Add at the bottom of the window.
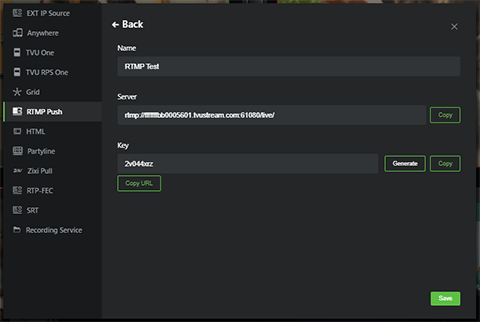
- In the Name field, enter a Name for your RTMP source.
- The unique address in the Server field is required to push the RTMP to the Producer instance. The stream destination address must be entered on the external device.
Note: that the server URL will change with a new Producer instance.
- Click the Generate button to generate an authentication key.
- Below the key field, Click Copy URL. Enter this complete URL into the source device.
- Click the Save button.
The Add RTMP Push Source window opens.
- Select your new RTMP source, and the green check mark displays to confirm your selection.
- Click the Add to Source button.
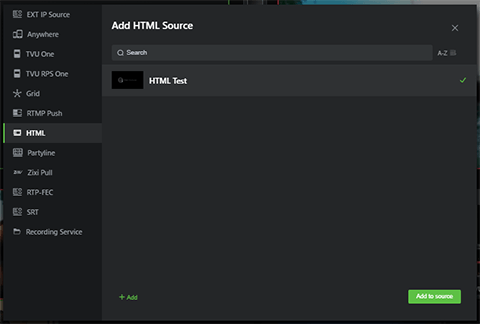
Adding an HTML source
To add an HTML video stream into Producer, complete the following steps:
- In the Producer User Interface, click +Add Source.
- In the Add EXT IP Source pop-up window, Click HTML from the left menu and click +Add at the bottom of the window.
- Enter a source Name.
- Enter a source URL in the HTML field and click Save.
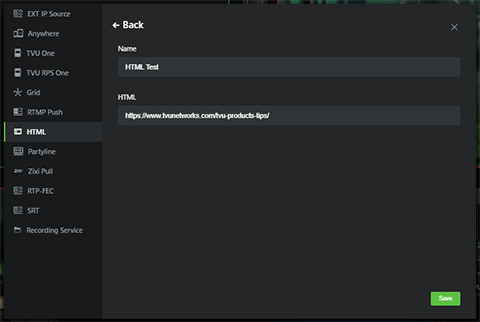
- Select the source feed from the list and click the Add to source button.
Adding a Partyline source
To add an active Partyline participant source into Producer, complete the following steps:
- In the Producer User Interface, click +Add Source.
- In the Add EXT IP Source pop-up window, Click Partyline in the left menu. An active Partyline session ID displays.
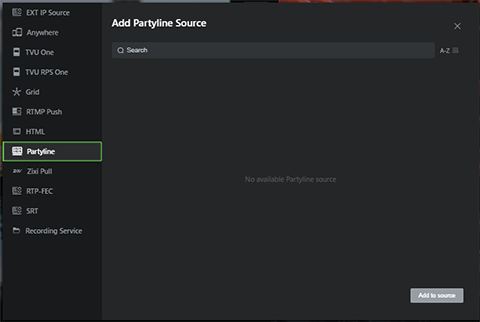
- Click the Partyline ID and choose a Partyline participant from the drop-down menu.
- Click the Add to source button.
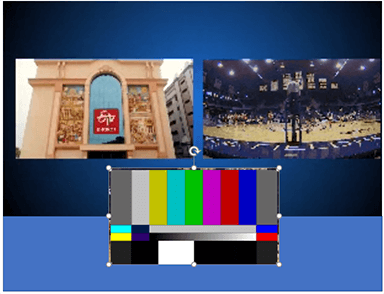
Customizable Multi view feature
The Customizable Multi view feature allows users to crop and resize custom multi-view sources within TVU Producer for a Live show. The multi-view sources, such as the quad-view and dual-view, are available on input source 7.
Using the Customizable Multi view feature enhances the editing capabilities of the multi-view landscape and vertical mode functionality. It also assists in transforming a single input source into a two, three, four, five, or six-window view to quickly match the needs of the technical producer for a Live show. Users can
build their unique, innovative multi-views based on the number of talents participating in a news or entertainment show.
The following examples show how multi-view sources display.


To use the Customizable Multi view feature, complete the following steps:
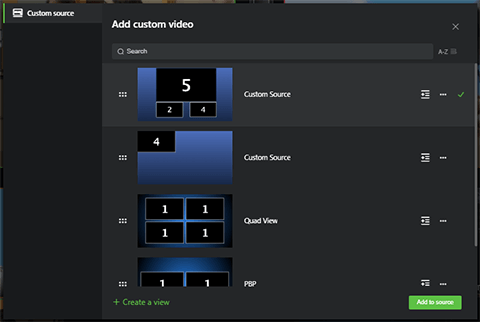
- Go to Input Source 7 and click + Add Custom Video.
- Click +Create a view. The canvas displays to build your Multiview sources.
- Add your first source and resize your image with X and Y coordinates.
- Click the Crop tool.
- Adjust the Crop coordinates as desired. Then, click Finish Crop.”
Note: To create a duplicate of your source, use the Copy command.
- Add your second source, use the X and Y coordinates to resize your image, and set it to the same height as the first image.
- Click the Crop tool.
- Adjust the Crop coordinates as desired. Then, click Finish Crop.
- You can continue building the supported Multiview sources based on your needs.
- To change the name of your custom source, click Custom Source. Then, enter a new name.
- To change the background image, click Background in the left panel to change and upload a new image. Then, click Done.
- The “Add Custom Video” menu displays. This menu will enable you to edit, duplicate, or delete the custom view.
- To add a custom view to the input source, select any “custom source” from the menu, and click the Add to Source button.
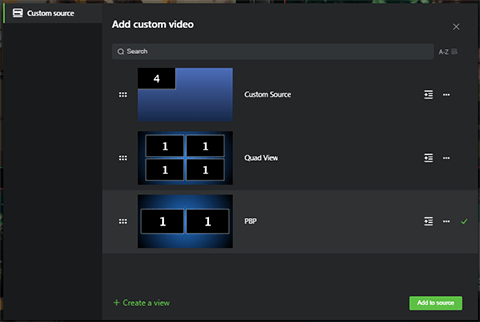
Custom view and border feature
Producer and the Multiview feature allow users to customize multiple views with borders. The basic Producer account includes the quad view and PiP custom views as default selections for this feature.
To use the custom view and border feature, complete the following steps:
- Click +Add custom video in the source window. The “Add custom video” window displays.
- Select a view and click + Create a view at the bottom of the window.
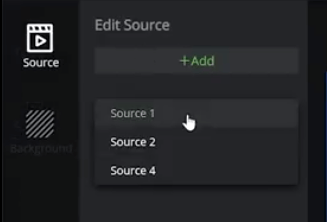
- In the “Edit Source” panel, click +Add. Select any number of available sources you want to customize from the drop-down menu.
- Your selected source is displayed in the “Edit source” panel. Click the source and drag it to a desired position into the “Custom Source” window.
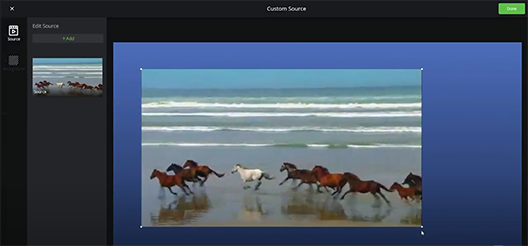
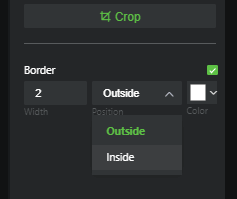
- To add a border to your selected source, click the checkbox to enable the Border feature. Then, choose your border width, position, and color from the drop-down menus.
- In the top right corner of the user interface, click the Done button to save your changes.
- In the “Add custom video” window, select a “Custom Source.” A green check mark confirms your selection. Then, click the Add to source button to move your custom source into Producer.
- Repeat the procedure to add a second custom source to your Producer project.
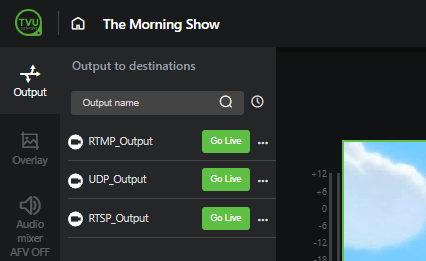
Using the output feature
TVU Producer can simultaneously output live video directly to Facebook Live, YouTube Live, Periscope, Producer, and CDN platforms. It can also output video to SDI through a TVU receiver decoder.
To select an output destination for a video source, complete the following steps:
- Select the source preview window and click the Output icon in the left panel.
The Output to destinations menu opens.

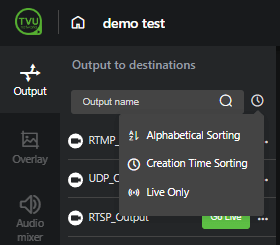
- Click the Clock icon to filter your list.
- Click +Add to choose an output type and Select the output destination.
- Select your output method in the panel list. To configure your output choice, click the three dots “..” and enter the required information.
- To take your source live, click the Go Live button.
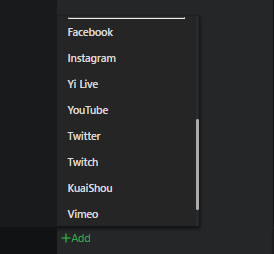
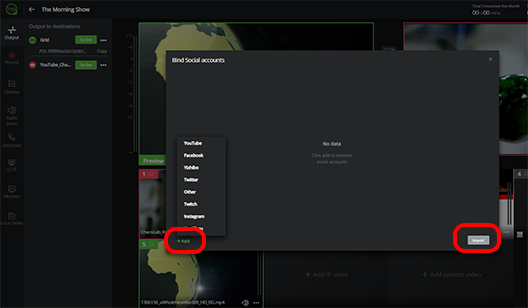
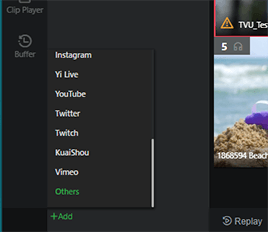
Adding a social media account
The first time a user logs in, the output section will not have any social media accounts to choose from. The user must bind social media accounts to the list before proceeding.
To bind a list of social media accounts, complete the following steps:
- Select the source preview window and click the Output icon in the left panel.
The Output window opens.
- Click the + Add button at the bottom of the Output to destinations panel.
- Select a social media account from the menu.
- The Bind Social Accounts menu opens.
- Click Add, and a list of all social media options display.
Notes: The ISSP, HLS, and SRT output menu options are also available. The ISSP single output transmission, GRID output requires Support to configure your PID.
The Other menu option is described in ‘Vertical mode outputs in Producer.”
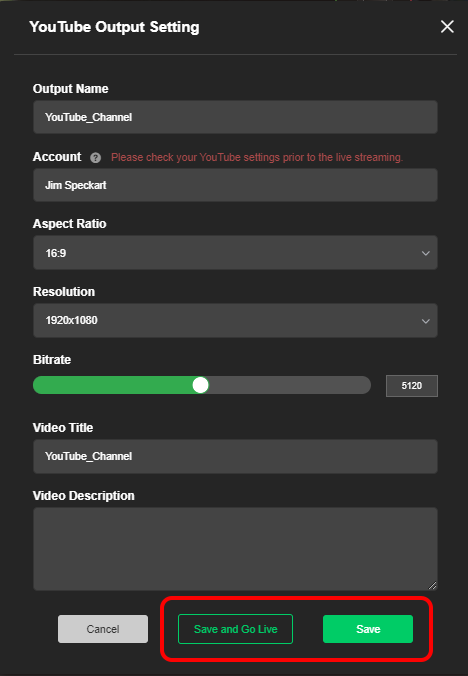
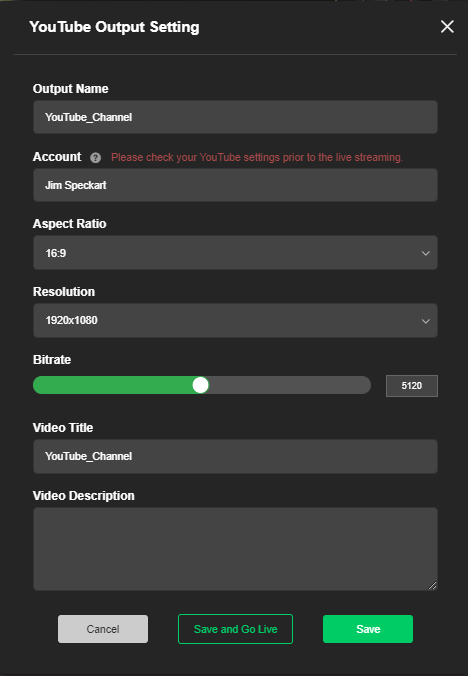
- To add a new YouTube account. Select YouTube from the pop-up menu.
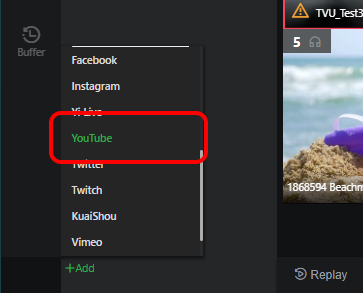
The YouTube account window opens.
- Enter a Name for the channel in the Output Name field.
- Click the Automatic radio button.
- Select a Resolution and Bitrate.
- Select the GOP size and Stream type.
- Click the Authenticate button and click Save to output the stream.

- To edit the YouTube setting, click the three-dot ‘…‘ icon and select Edit.
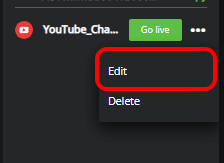
- Make your changes in the YouTube Output Setting pop-up and click Save or Save and Go Live.
Perform the same steps to authenticate the other social account selections. Once an account is added, the user imports the social account to be shown in the output section. Then, it is ready to go live on specific outputs.
For a list of Automation settings for YouTube, click the Account ”?” icon to open the guidebook for sharing on the social help page.
Vertical mode outputs in Producer
Complete the following two steps to output a TVU Anywhere video in the vertical mode in Producer.
Note: make sure the output destination supports 9:16.
Step 1
- Sign in to your Producer account. After a successful sign-in, the Producer Workbench user interface displays.
- Create or select a program to start. Select the video to be output in the Program window.
- Locate the output account, click the three-dot ‘…‘ icon, then click Setting.
- The Settings pop-up window displays.
- Click the Vertical checkbox to enable the Vertical video mode feature. Set the Aspect Ratio to 9:16 and the Resolution to 608×1080. Then, click Save.
- Click Enter to start your program in TVU Producer. The Producer user interface displays in a vertical format.
Step 2
Set your source output settings in Producer to match your vertical source settings In the TVU Producer interface:
- Click + Add source and add a video source from the Add source window. Then click the Add to source button.
- To select a video to be output in the Program window, click Output in the left pane and set up or select an authenticated destination from the list. Click Output in the left pane.
- Click the three-dot ‘…‘ icon, then click More.
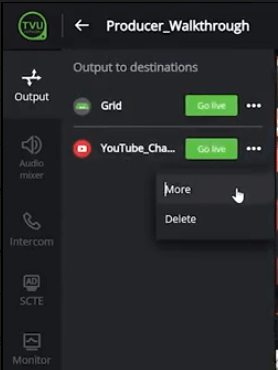
The Output Setting pop-up window displays.
- Set the Aspect radio to 9:16 and the Resolution to 608×1080. Then, click Save and go live to start output in the vertical mode.
Your video sources display in vertical (portrait) format.
Vertical output lines in the TVU Anywhere app
The vertical lines in the TVU Anywhere app will display on a specific occasion. When Producer is in horizontal mode, you can set the output to 9:16. When set to 9:16, the vertical lines in the TVU Anywhere app will display. When Producer is configured for vertical output, these lines do not display in the TVU Anywhere app.
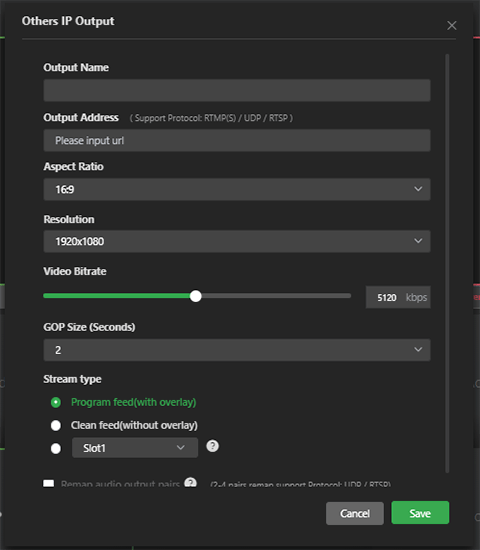
Other IP outputs
The Other selection in the social media menu allows users to enter a URL to take a stream to a custom CDN or their Live cloud workflow. File, RTMP(s), HLS, UDP, RTSP, SRT, and NDI have supported protocols.
To use the Other social media menu option, complete the following steps:
- Select the source preview window and click the Output icon in the left pane.
The Output window opens.
- Click the Import button. The Bind Social Accounts menu opens.
- Click Add, a list of all social media options, including the other option displays.
- To add a new YouTube account. Select Others from the popup menu.
The Others IP output window opens.
- Enter a name for the channel in the Output name field.
- Enter the address in the output address field
- Click the Save button.
Video publishing
The vertical video users have increased as 75% of users play videos on their mobile devices. This TVU Producer feature helps to improve your chances of making your live broadcasts go viral. Using this feature has the following benefits:
- Enables mobile customers with immersive experiences by sending out the vertical video in portrait mode with a 9:16 aspect ratio.
- Target your live audience using social media outputs already supported on Facebook and YouTube.
- Allows simultaneous recording and optimization of videos to enable both landscape and portrait modes.
- Distribute to target destinations according to device orientation, geography, platform specifications, and audience needs.
TVU Producer supports video publishing in multiple ways:
- Output to all social media using direct integrations.
- Output a custom CDN using generic protocols such as SRT, Pro-MPEG, and RTMP.
To add an SRT output, complete the following steps:
- Select the source preview window and click the Output icon in the left pane.
The Output window opens.
- Click the Add button. Then, select SRT.
- Choose the SRT type and enter the host name and port. Then, select the appropriate parameters.
- Click Save and Go Live.
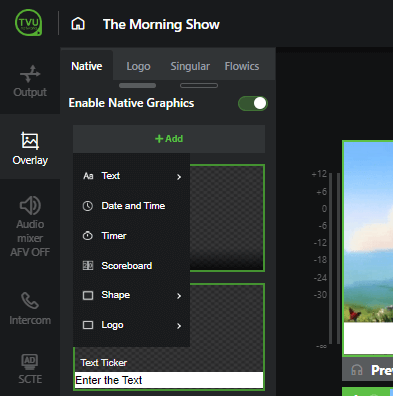
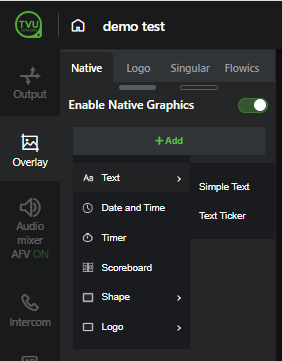
Using the overlay feature
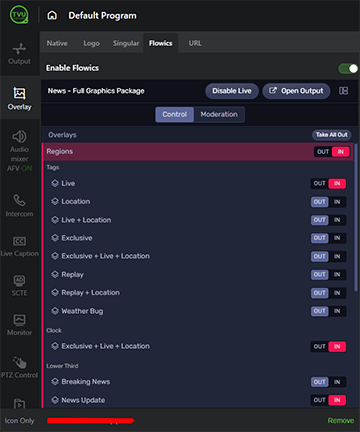
The Overlay feature allows a user to add customized graphic and text overlays to your live video. These include native overlays such as text from the Native tab and Logos from the Logo tab. In addition, Producer features real-time overlays and data visualizations such as animations and transitions by integrating Singular.live sources from the Singular tab or Flowics sources from the Flowics tab.
To open the overlay menu, click Overlay in the left navigation menu. The overlay menu opens.
In the Overlay menu, there are four types of overlay tabs to choose from, the Native, Logo, Singular, and Flowics tab.
- Click the Native or Logo tab to select and place a locally sourced logo overlay or text into your production. Graphics can also be added to the list by clicking the Add button.
- Click the Singular or Flowics tab to select and add a dynamic overlay into your production from Singular.live or Flowics.

Native text overlay
The native text overlay feature allows the user to add a text overlay within the producer UI without subscribing to an external overlay program.
To add a native text overlay to your production, start the Producer instance and complete the following steps:
- Click the Overlay icon in the left navigation menu and click the Native tab.
- Use the slider to enable native graphics.
- Click +Add > Text > Simple text or Text Ticker for scrolling text.
- Enter your text and select your font and display options from the menu.
- To edit a text overlay, click the text element in the Preview window and make changes to the text panel.
- To enable or disable text overlay, click the Enable Native Graphics slider.
- Click the Clear overlay button to clear all overlays from the Preview window.
Native logo overlay
To add a native logo overlay to your production, start the Producer instance and complete the following steps:
- Click the Overlay icon in the left navigation menu and click the Logo tab. The logo list displays.
- If you prefer a logo that does not appear in the logo list, click the +Add button and select From computer or From Cloud Drive.
The local file browser window opens.
- Locate your preferred logo file. Supported formats are JPG, GIF, and PNG (up to 1920×1080 ppi). Select the file and press Open. The image is added to the list.
- Select a logo overlay from the list. The logo moves to the Preview window.
- To move your overlay from the preview window into the program window, click the Overlay Cut (F6) button.
Singular overlay
To add a Singular.live App Token overlay to your production, complete the following steps:
- Click the Overlay icon in the left navigation menu and click the Singular tab.
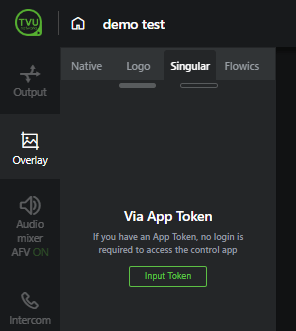
- To use an App URL, click Input Token. Enter your token code and click Done.
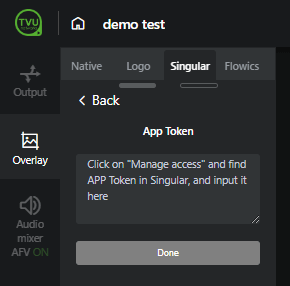
- The dynamic Singular.live overlay selections display.
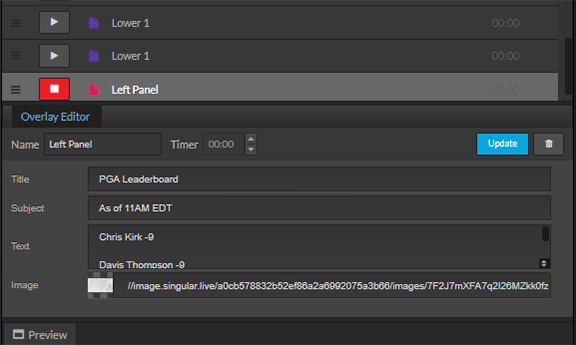
- Select an overlay from the list. The status icon turns to a red box when active. Click Update to move the overlay into the Preview window.
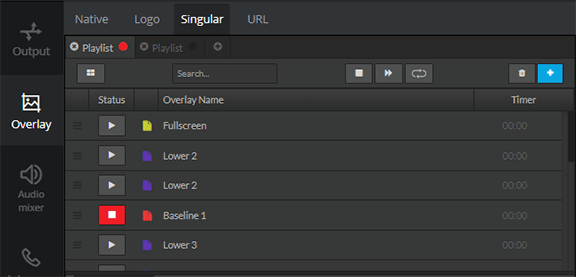
- To edit a selected overlay, make changes and click the Update button to save and move your changes into the preview window. Repeat this procedure to add additional App URL overlays into the preview window.
- To move your overlay into the program window, press F6.
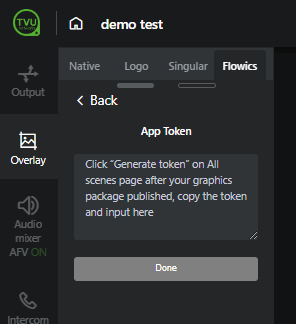
Flowics overlay
To add a Flowtics overlay, complete the following steps:
- Click the Overlay icon in the left navigation menu, and click the Flowics tab, then click Input Token.
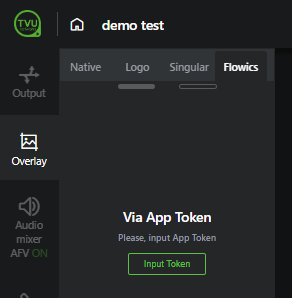
- Follow the window prompts, then copy and paste the App Token and click Done.
- When clicking “Login”, a separate tab redirects the user to Flowics for login.
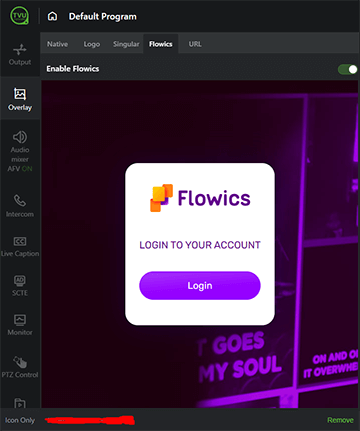
- Enable the Flowics slider to use the controls in the Flowics tab.
Clear and remove overlay feature
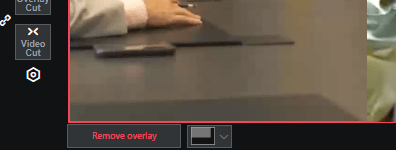
The clear and remove overlay feature allows a user to clear overlays in the Preview window and remove overlays from the Program window with a simple click of a button:
- To clear overlays from the Preview window, click the Clear overlay button below the Preview window.
- Click the Remove overlay button below the Program window to remove overlays from the Program window.

Taking a source live
To take a source live, complete the following steps:
- Click a source in the source panel. The source displays in the Preview window.
The Preview window is the top left window outlined in a green border. A preview of a video source is displayed in the Preview window.
- To hide the video in the preview window, click the eye icon in the bottom left corner of the preview window. To turn on sound monitoring, click the headset icon. To turn these features off, click the icons again.
The Program window is the top right window outlined in a red border.
- Click the Space bar or Video Cut button located between the Preview and program window to move the video into Live mode.
- Click the link icon and press the space bar or Video Cut button to move the overlay and preview into the Program window simultaneously.
Note: The Video Cut button moves the source from the Preview window to the Program window.
In addition, the following keyboard shortcuts are supported in TVU Producer:
- Press 1 to take your Input Source #1 to the PVW window. Then, press the space bar to cut source #1 in PVW to the PGM window.
- Press 2 to take your Input Source #2 to the PVW window. Then, press the space bar to cut source #2 in PVW to the PGM window.
- Press 7 to take your Input Source #7 to the PVW window. Then, press the space bar to cut source #7 in PVW to the PGM window.
A ‘LIVE’ overlay displays in the Program window to indicate a live transmission.
To access the keyboard shortcuts page, click the Management Center tab in the Workbench UI and select Shortcuts in the left menu.
The Keyboard Shortcuts page opens.
- To turn on sound monitoring, click the headset icon. To turn the feature off, click the icon again.
Switching and transition features
There are six icons between the PVW and PGM windows, primarily including two key switches: Video Cut, Overlay Cut, three transitions, and Settings. The three transitions include Dissolve, Iris in, and Iris out. To cut the overlay and video simultaneously, click the link icon between the Overlay cut and Video cut icons.
The Transition feature provides three special effects displayed in the live streaming show when you connect or switch from one live feed or scene to another live feed or new scene when producing a live production. The Transition feature increases the overall production value and provides a better experience for the audience.
The primary producer of the live show usually controls live production transitions. The producer must choose the transition in the TVU Producer UI when switching between the two scenes or live feeds. This feature is also useful when the producer is taking a break or returning after taking a break.
Switching feature
The TVU Producer Web interface provides the following two switching features for the primary TVU Producer operator:
Transition feature
The TVU Producer Web interface provides the following three-key transition features for the primary TVU Producer operator:
- Dissolve – The Dissolve transition (F1) is a special effect that allows a gradual change from one image to another. As the first image dissolves, the second image gradually appears.
The Dissolve transition allows a previous scene to dissolve, revealing the new scene.
The Dissolve transition allows a previous scene to dissolve, revealing the new scene.
- Iris In – The Iris In transition (F2) places a circle around the frame and creates a dark silhouette around the image. Using the Iris In effect, enables the user to close a previous scene to reveal a new scene.
- Iris Out – The Iris Out transition (F3) turns the edges of the frame to solid black. Then, the black edges push inwards, forcing the view of the scene into an ever-dwindling circle as if the camera iris closing.
The Iris transitions provide an alternative to fade-in or fadeout functionality. Use the Iris In and Iris Out transitions as creative masking techniques to draw the viewers’ attention to a specific visual before the rest of the scene fully displays.
Using the Transition feature in TVU Producer
Three different transitions, Dissolve, Iris In, and Iris Out, are currently supported in TVU Producer. The Overlay cut and Video cut icons below the transition icons are used to cut the selected transitions from the PVW into the PGM window. Keyboard shortcuts for each function are printed on each icon.
To enable the transition features, complete the following steps:
- Select to place your transition type icons between the PVW and PGM windows.
- A control panel displays next to the selected icon as you select your transition type.
- Use the control panel to set the time (in milliseconds) it takes to execute the selected transition.
Note: The default value for each transition is 1500 milliseconds. This default can be changed by the operator as appropriate.
- Repeat the process for each transition.
- Click the Overlay cut icon (F6) and Video cut icon (space bar) as needed.
Adding an overlay to the live transmission
Press the Overlay cut (F6) button to move the overlay source from the Preview window to the Program window. The Overlay cut button is located between the preview and program windows.
L band transition
The L band transition menu allows users to create a new transitional view in the Program window while live. This Dissolve transition allows a previous scene to dissolve, revealing the new scene.
To create a new view or add one, complete the following steps:
- Click the L band transition Setting icon.
- In the L band transition setting window, click +Create a view.
- Choose the Squeeze type and edit the transition. Click the Background tab to add a (1920 x 1080) background.
- Click the Done button to save your settings.
- Select the background and click the Add to L-Band button.

Stopping a live transmission
To stop the live transmission, complete the following steps:
- Click the red On Air icon in the left navigation menu. The output menu opens. The Live transmission in the Output to destination list displays as ‘On Air.’
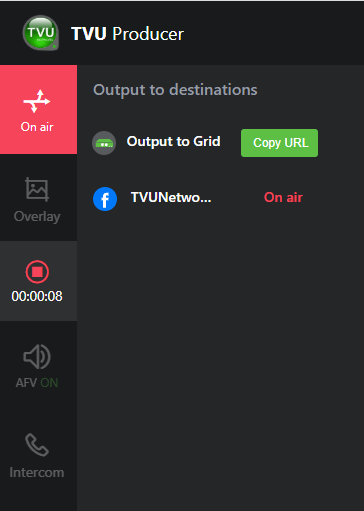
- Mouse over On Air to reveal the End Live button.
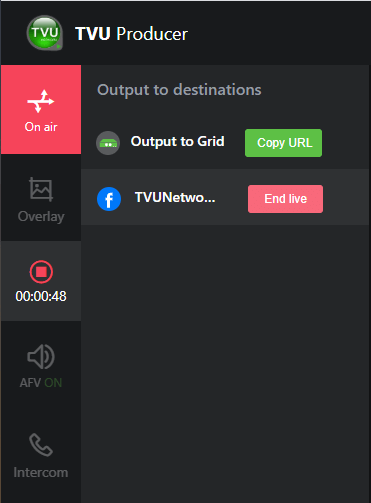
- Click the End live button to stop the transmission.
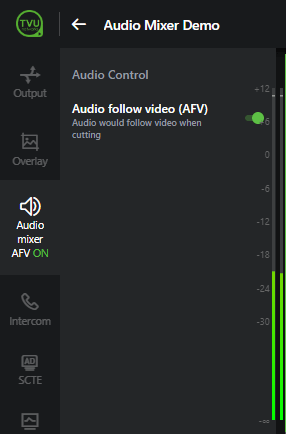
Audio control
The Audio Mixer tab is located in the left navigation menu.

- The AFV switch is enabled by default, allowing the input source cut to live broadcast/PGM to have its sound channel cut along with it.
- If the AFV switch is disabled/off, the sound for live streaming is selected by choosing an alternate audio channel source.
To choose an alternate audio channel source, complete the following steps:
- Click the Audio mixer tab.
The Audio Control menu opens.
- Move the Audio Follows Video switch to the left (green) to disable the switch (AFV off). The Audio control window displays alternate channels.
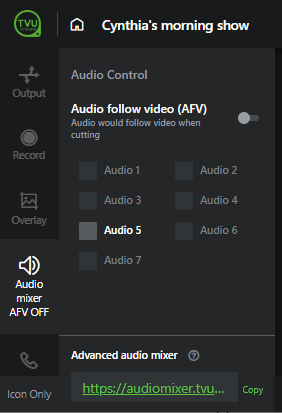
- Select a radio button for an alternate audio channel source. When an alternate audio source is selected, the audio icon changes from Audio ON to Audio 1.
- To adjust the volume control for each source, click the speaker icon and move the slider.
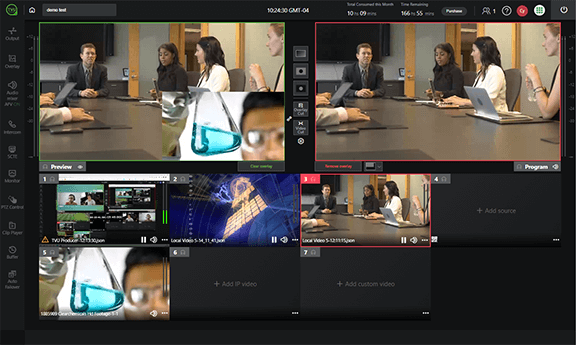
Using the PIP feature
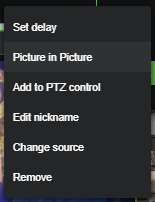
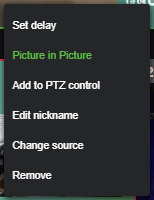
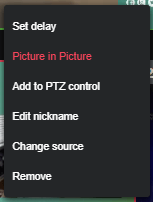
The picture-in-picture (PIP) feature allows the user to display a thumbnail of a source window on top of your live transmission. The PIP selection is located at the bottom of the source window in the settings ‘…‘ menu. The PIP menu selection changes its color according to the following three states:
- When the PIP menu selection does not have a colored background, this feature is not being used.
- When the PIP menu selection is green, this indicates that the PIP overlay has been moved into the preview window.
- When the PIP menu selection is red, the PIP overlay has been cut to the program window and is live.
To use the PIP feature, complete the following steps:
- Click the source window to move the source to the Preview window.
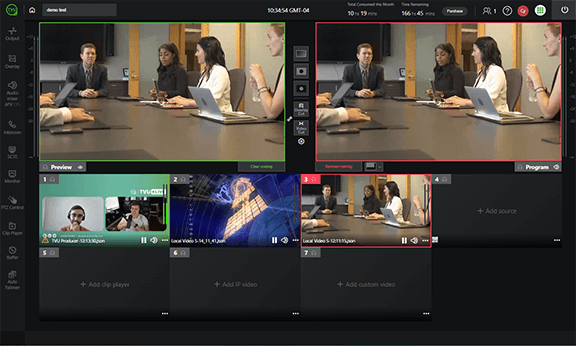
- Select a second source or +Add a second source to the source panel.
- To add a PiP, click the three-dot “…” icon in the second source window and select Picture in picture.
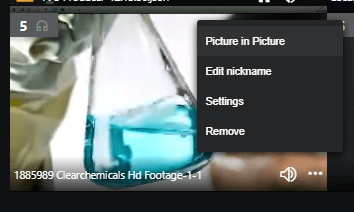
The second source is displayed in a small box at the bottom of the Preview window.
- To remove the PIP overlay from the preview window, click the Clear overlay button.
- Add the PiP to the preview window and press F6 or the Overlay cut button to move the PIP overlay to your live transmission.
- Click the Remove overlay button to remove the PiP from the Program window.
Input Source Recording feature
Users can record each camera source independently of other feeds and the final program output when the Input Source Recording feature is enabled. Recorded files are saved in TS file format.
Postproduction teams are continually looking to TVU Oneage and reTVU Oneage content not just for TV, but for mobile apps and social media platforms. In this environment, it is no longer enough to only record the final output/ master mix as it limits the editing playing field.
Editors can now feel the freedom and be well prepared for all the postproduction requests by having HD quality ISO’s for each individual feed, much in advance.
The Input Source Recording feature enables you to:
- Effortlessly fix live mistakes during postproduction
- Create custom content for social media
- Add customized graphics to formulate a whole new program
- Enhance revenue opportunities for your digital asset
- Re-purpose and rehash content with clean feeds
- Significantly slash cost and time
For more information about downloading files, refer to “User management menu.”
To enable the Input Source Recording feature, complete the following steps:
- Create a new Program or Edit your current program settings and enable the Input Source Recording checkbox.
- Add the source slots you want to record from the drop-down menu and click Save.

- Start your program or live instance.
- As soon as the new Producer program is up and running, the ISO recording automatically switches ON. It records all the ingested sources from the beginning until the end of your live show. The input source recording will stop only when you shut down your producer instance or program.
- All cloud recordings can be accessed using the Cloud Record tab option within the Workbench.
To access the recordings, complete the following steps:
- Click the TVU Producer Workbench tab.
- The “Management Center” and “Cloud Record” tabs are displayed in the top panel.
You can see all the input source recordings in the Cloud Record tab. The Cloud Record tab opens in a new window. - Click the Cloud Record tab. In the left panel, you can select Remote Recorded files and Recorded files. Each recording is named with the program name, date, and time, along with details about the Start and End times of your program instance.
- When you click Recorded files and select a recording folder, your Input and Output source folders display the following folders:
Input Source 1, Input Source 2, Input Source 3, Input Source 4, Input Source 5, Input Source 6, and PGM Output.
To download your program file to your local drive, complete the following steps:
- Click the Cloud Record tab.
- Click Recorded files in the left panel. A list of your recordings displays.
- Click on a recording source. Hover your mouse over the recording you would like to download. Then, click the download button.
Management Center tab functions
The Management Center tab provides a list of all of your previously recorded program files before the Input Source Record feature is enabled. From the Management Center tab, you can view your usage, program shortcuts and enable or disable email notifications and Auto shut-down functions.
Replay operations
The Replay function can record and last 60 seconds of video input from source windows 1 through 4. The recorded video can be rewound and previewed from the Replay panel.
To preview or replay your recording, complete the following steps:
- Click the Replay button at the bottom of the screen.
The Replay button opens the Recorded content panel where your recorded content is stored.
- Mouse over the recorded clip and click the green Rewind button.
The recorded content and timeline displays.

- Move the yellow slider over the frames you want to preview to select and preview a range of frames.

- Click the play icon in the Preview window. To add a transition to your clip, click a transition type from one of the transition buttons located between the Preview and Program windows.
- Click the Space bar or Video cut button to move your clip to the Program window.
- To return to the recorded video for another selection, click Update at the bottom of the window and repeat the process.
Clip player feature
The Clip Player feature in TVU Producer is enhanced with comprehensive support capabilities for all local clips’ basic and advanced operations, including playlist. Video uploads are also unlimited.
The new playback enhancements added to the Local Clip player in TVU Producer include the following functions:
- Pause, forward, rewind, and auto-play – The Clip Player now allows you to pause, rewind, and fast-forward the local clip as desired and/or play it from your desired location for a specific duration.
The Auto-Play configuration settings will allow users to play video automatically when taken into the PGM window. You can switch the video off from this position as desired. - Cue, mark-in setting for each local clip – To cue video determines the desired initial playback point in a specific frame of your video Clip. The enhanced clip player allows users to cue video in the desired location and play it in the PGM window from a current frame location.
Users can set the mark-in locations for the start time and end time. The mark-in function will allow the user to play any local clip from a particular start time for a specific duration or until a selected end-time in the playback duration is reached. - Cut PVW to PGM setting – The Cut PVW to PGM setting allows the user to auto-cut from the PVW to PGM window when the entire local clip is successfully played. Using this function explicitly applies when you play a local clip or playlist without looping.
When looping, the individual file or the playlist continuously plays, whereas if you do not loop and choose PVW to PGM, it successfully finishes the playback. Then, an automatic video cut executes, and the live feed from the PVW window moves into the PGM window.
Using the Clip player features
To use the Clip player tab features, use the full set of functions displayed in the local video file list panel to perform the rewind, pause, and forward controls for any local clip associated with the live show.

Clip player interface
The local clip player provides a set of comprehensive features to run video clips within TVU Producer.
You can add any number of local video files to your program for running alternate footage in your live show. Running alternative footage adds the necessary dimension to your live show, helps cover potential errors, and keeps your audience actively engaged.
The local clip player supports all the basic and advanced operations to either play a single video clip or a set of video clips as a playlist. The TVU Producer Web interface allows you to change the file order and adjust your playlist based on your needs.
Basic functions
The local clip player Web interface includes the following basic functions:
- Play icon – Click the play icon to play the clip.
- Rewind icon – Click the rewind icon to rewind the clip.
Forward icon – Click the forward icon to advance your clip forward in the timeline.
- Seek bar – The seek bar enables you to cue the player or determine the desired initial playback point in a video clip.
Advanced functions
The local clip player Web interface includes the following advanced functions:
Single clip icon – The single clip icon enables you to play a single clip and auto-pause until the end of the clip.
- Loop file icon – The loop file icon enables you to loop a single file.
- Play-to-playlist icon – The play-to-playlist icon enables you to play the playlist one time.
- Loop playlist icon – The loop playlist icon enables you to loop the playlist.
- Edit file icon – Click the edit file icon to set the mark-in points and jump in programmatically.
- Play settings menu – To open the Play settings menu, click the control panel icon (gear).
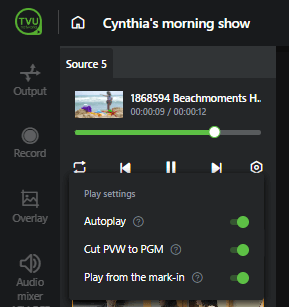
The Play settings menu has the following three settings and functions:
- Auto play – Auto-Play is ON by default. When Auto-Play is ON, the file plays from the mark-in point. If the Mark-in point is not set, the file will start playing from the beginning.
When Auto-Play is OFF, the file will not re-start automatically. The file will continue in the paused state when it is Cut to PGM.
- Cut PVW to PGM – The Cut PVW to PGM setting allows the user to auto-cut PVW to PGM when the entire local clip has successfully played. This specifically applies when you play a local clip or playlist without looping. When set to looping, the individual file or the playlist continuously plays, whereas if you do not loop and choose PVW to PGM, it successfully finishes the playback. Then, an automatic video cut occurs, and the live feed from the PVW window moves into the PGM window.
- Play from the mark-in – With every local clip uploaded into TVU Producer, the user can set the mark-in locations (start time & end time). Once the user has set the mark-in points and enables Autoplay, the playback happens automatically from the mark-in points. This will always allow the producer user to play any local clip individually or as part of the playlist from a specific start time until a selected end time in the playback duration.
User management menu
The User Management menu allows a user to access the following:
- Select between English and Chinese languages
- Access the keyboard shortcut menu
- Choose a new Theme color
- Sign out of Producer
To open the User Management menu, click the round icon next to the power button in the main navigation bar.
To access the Recorded files selection, click the back button in the top left of the screen to return to Workbench. Then, click the Management Center tab to access the recorded file menu.

Time remaining indicator
The time remaining indicator is located on the right side of the main navigation bar. This indicator shows you how much time is left on your Producer subscription. Once you log in, the timer starts. To stop the timer, you must click the power button in the window’s top left corner.

Advanced Audio Mixer
The Advanced Audio Mixer is a dedicated separate interface built for audio operators to mix audio for the program separately from video and graphics operation.
Use the Advanced Audio Mixer to:
- Monitor each video feed for production
- Adjust all audio input levels as well as the master output
- Adjust pans (audio gain) for each channel
- Assign channels for each group for simple management of multiple sources
- Mute each channel or select as a solo monitor for fine tuning
Multi-audio channel feature
This feature supports 2, 4, 6, or 8 embedded output audio channels in Producer. These channels are configured in the Workbench Settings window for your Producer project. The Audio mix option in Producer allows up to 4 pairs of audio channels to be configured by selecting the Audio Output Pair Control feature in the Audio mix panel. This feature is useful for multi-language outputs.
A user can independently adjust the volume of the audio output channels assigned to each pair. The volume for each pair of output channels can be adjusted or muted using the Master output level control slider in the Audio mix panel.
Note: For more information, refer to the TVU Producer Audio Mixer Quick Start User Guide.
Captioning feature
The Captioning feature in Producer provides the capability to deliver both closed captions and live captions into the program output of TVU Producer. This enables our customers to automatically add closed and live captions to the outgoing live feed from TVU Producer. Live Captioning is supported by integration with a third-party caption provider EEG. Closed captioning is provided through TVU Producer’s integration with TVU transcriber.
Note: To enable this feature, please contact your TVU Sales representative.
To enable the Captioning feature, TVU Producer is integrated with TVU Transcriber, the AI-based audio-to-text TVU converter, to insert the captions. The captions are generated in real time, ensuring perfect synchronization with audio and video as needed for the audience. The Captioning feature is fully compliant with the Federal Communication Commission.
To use the Captioning feature in Producer, complete the following steps:
- Go to the Live Captions Menu item.
- Go to Transcriber on top.
- Click Go with it.
- Click Start.
SCTE 35- based dynamic ad insertion feature
Using TVU Producer, customers can perform a dynamic ad insertion for a Live broadcast by collaborating with third-party ad services. A new feature is available to manually insert SCTE slice points or triggers in Producer to signal an ad-insertion in the transport stream. SCTE pass-through is also supported. This
new feature complies with SCTE-35 protocols.
SCTE 35 markers are well-known and widely used in the digital broadcast industry and are supported in newer ABR delivery formats such as HLS.
An SCTE 35 marker inserts an ad into the stream at an exact timestamp. The inserted ad is active for several seconds. A splice point in the specific timestamp in a stream corresponds to an Instant Decoder Refresh (IDR) frame, which can be decoded independently without depending on what frames were decoded previously.
Benefits
- The SCTE-insertion feature allows customers to create additional sponsor revenue opportunities.
- The SCTE-insertion feature is intuitive in TVU Producer and accessible in the Producer interface.
- This ad insertion methodology is better than adding the ads on the client side.
Using the SCTE insertion feature
To use the SCTE insertion feature, complete the following steps:
- Click SCTE in the left navigation menu. The SCTE settings menu displays.
- Select the SCTE insertion option from the menu.
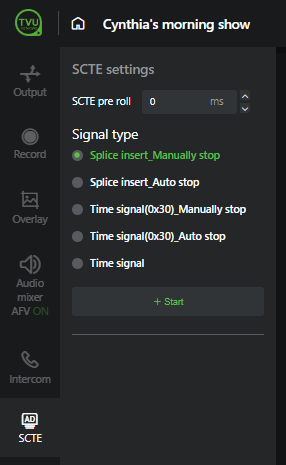
- Insert the SCTE slice points at the desired time slots. Then, choose the durations in the program output.
Note: Any number of insertions can be added at preferred time slots.
Monitoring and Diagnostics feature
The Monitoring and diagnostics feature provides a dashboard that displays the key parameters to indicate your IP feed health coming to all Input sources and the health of the outgoing live stream going into each destination. In addition, the user can view Producer timeline messages and diagnostic errors.
Diagnostic errors are run-time errors that occur as you start your cloud instance and build your live streaming workflow. This section lists any issues you could encounter during the ingest process or starting a live stream to any targeted destinations. Diagnostic errors may also point out transmission or network bandwidth issues.
Users should run the Monitoring feature or Dashboard on a separate PC as it also takes CPU and memory resources to present all the health-related metrics, including the PGM Output of Producer.
Using the Monitoring and Diagnostics feature
To use the Monitoring and Diagnostics feature, complete the following steps:
- In the left panel of the Producer User Interface, click the Monitor tab.

- The Producer Monitoring dashboard page displays in a new browser window.
The Producer Monitoring Dashboard displays all the relevant sections, Viz. Program Info, Input, Output, Closed captions, SCTE 35 Ad insertion feature, and the diagnostic log panel.
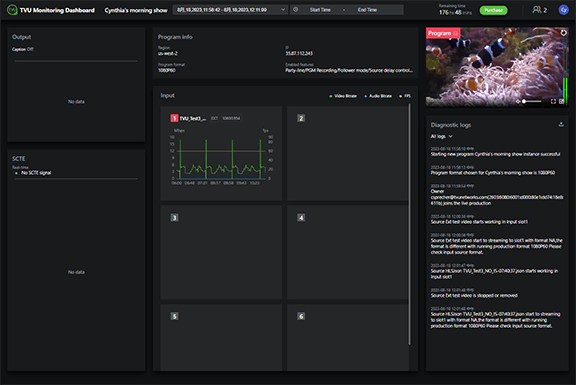
- The diagnostic logs are located in the left-scrolling panel.
- To download diagnostic logs, click the download icon in the top-right corner of the scrolling panel.
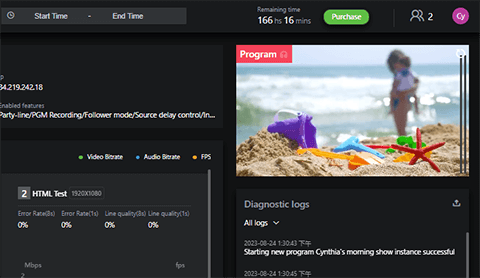
Using the PTZ Control feature
- To enable the PTZ control feature, click the PTZ Control tab.

- Select a source, click the three-dot ‘…’ icon, and select Add to PTZ Control.
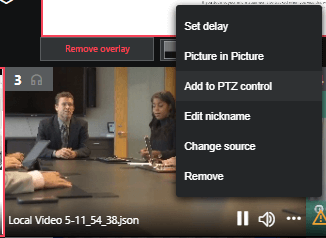
- The PTZ control panel controls are enabled. In the Source number drop-down menu, select a source Slot number.
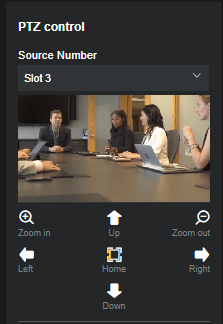
- Use the camera control icons below the preview to change the camera view.
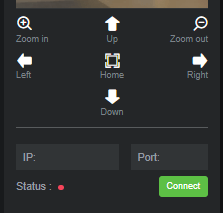
- Enter an IP address and Port in the provided fields to take your source live, then click the Connect button.
- To disable the PTZ Control feature, go to the PTZ source window, click the three-dot ‘…‘ icon, then select Remove from PTZ Control.
PTZ Control – VLAN configuration
The PTZ camera has to be reachable by Producer through the public internet. You can use a TVU Receiver or a TVU pack for VLAN setup. An additional option is to connect the camera directly to a public IP.
To set up VLAN configuration, complete the following steps:
- Set your TVU Transceiver as a VLAN Client: Set your camera as a DHCP client and connect it to the VLAN ETH port of your TVU transceiver or TVU One. That should give your camera an IP in the range 192.168.4.X (You can confirm by the “Connected Devices” menu below.)
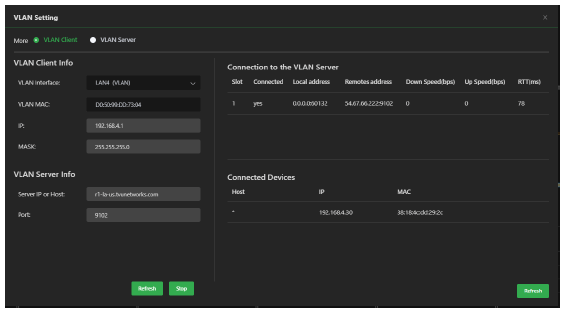
- Request the support team to create a port forwarding rule in Router Server. You need to provide the following:
- Camera MAC Address
- Camera local IP
- Camera local port (MUST be 52381 – That is a pre-defined port used by VISCA protocol)
- The support team will then provide you with an external IP and an external port that will be forwarded to your camera.
- Open Producer UI. Select the Transceiver/Pack to which your camera SDI/HDMI input is connected. Start the transmission to one of the Producer slots.
- Click on the “…” menu of the slot and select Add to PTZ Control.
- Go to the “PTZ Control” menu in the sidebar and open the dropdown for the “Source Number.” Select the slot reference to your source.
- Add the External IP and External Port provided by the Support team under the menu and click “Connect.”
- Start controlling your PTZ.
Output Buffer feature
The Output Buffer feature allows users to cut into a video when censorship is necessary then, resume programming.
To use the Buffer feature, complete the following steps:
- Click the Buffer tab.

- Click the Upload replacement video button on the Buffer settings panel and choose a video From computer or From Cloud Drive.
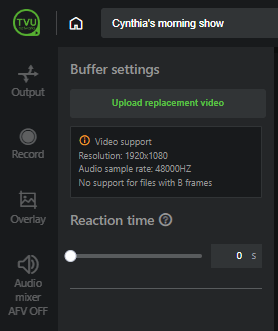
- Select the uploaded video and set a Reaction time in seconds using the slider.
Auto Failover feature
The Auto Failover feature allows users to set up a backup video to the primary video. If the primary video in PGM fails to play within the time for Auto Failover, it automatically replaces the primary with a secondary video.
To use the Auto Failover feature, complete the following steps:
- Click the Auto Failover tab.

- Select a Primary and Secondary slot.
- Set the Time for Auto Failover and click Save.
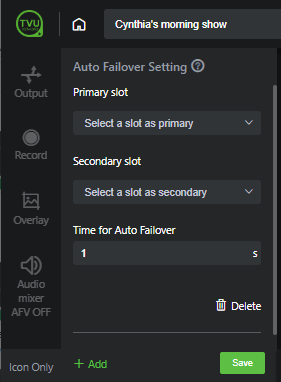
Purchasing TVU Producer
After registering for an account, a user can purchase Producer online using PayPal. To purchase a TVU Producer subscription, sign up for an account and click the Purchase button in the top main navigation bar.
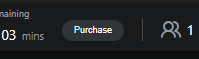
We empower publishers, broadcasters, and enterprises to deliver the broadcast to the widest audience on any platform, anywhere on the globe, by transforming your PC into a live production control room. You can innovate and create your live event into a unique next-generation experience.
There are two ways to purchase TVU Producer:
- Online
- The TVU sales team can set up a monthly pricing schedule for customers who do not prefer to pay online by contacting TVU Sales by Phone at +1 650.440.4812 or email at support@tvunetworks.com
© Copyright 2023 TVU Networks Corporation. All rights reserved in all media.
Document Part Number: TVU Producer QSUG Rev L EN 08-2023