


Contents
TVU Grid Token Quick Start User Guide
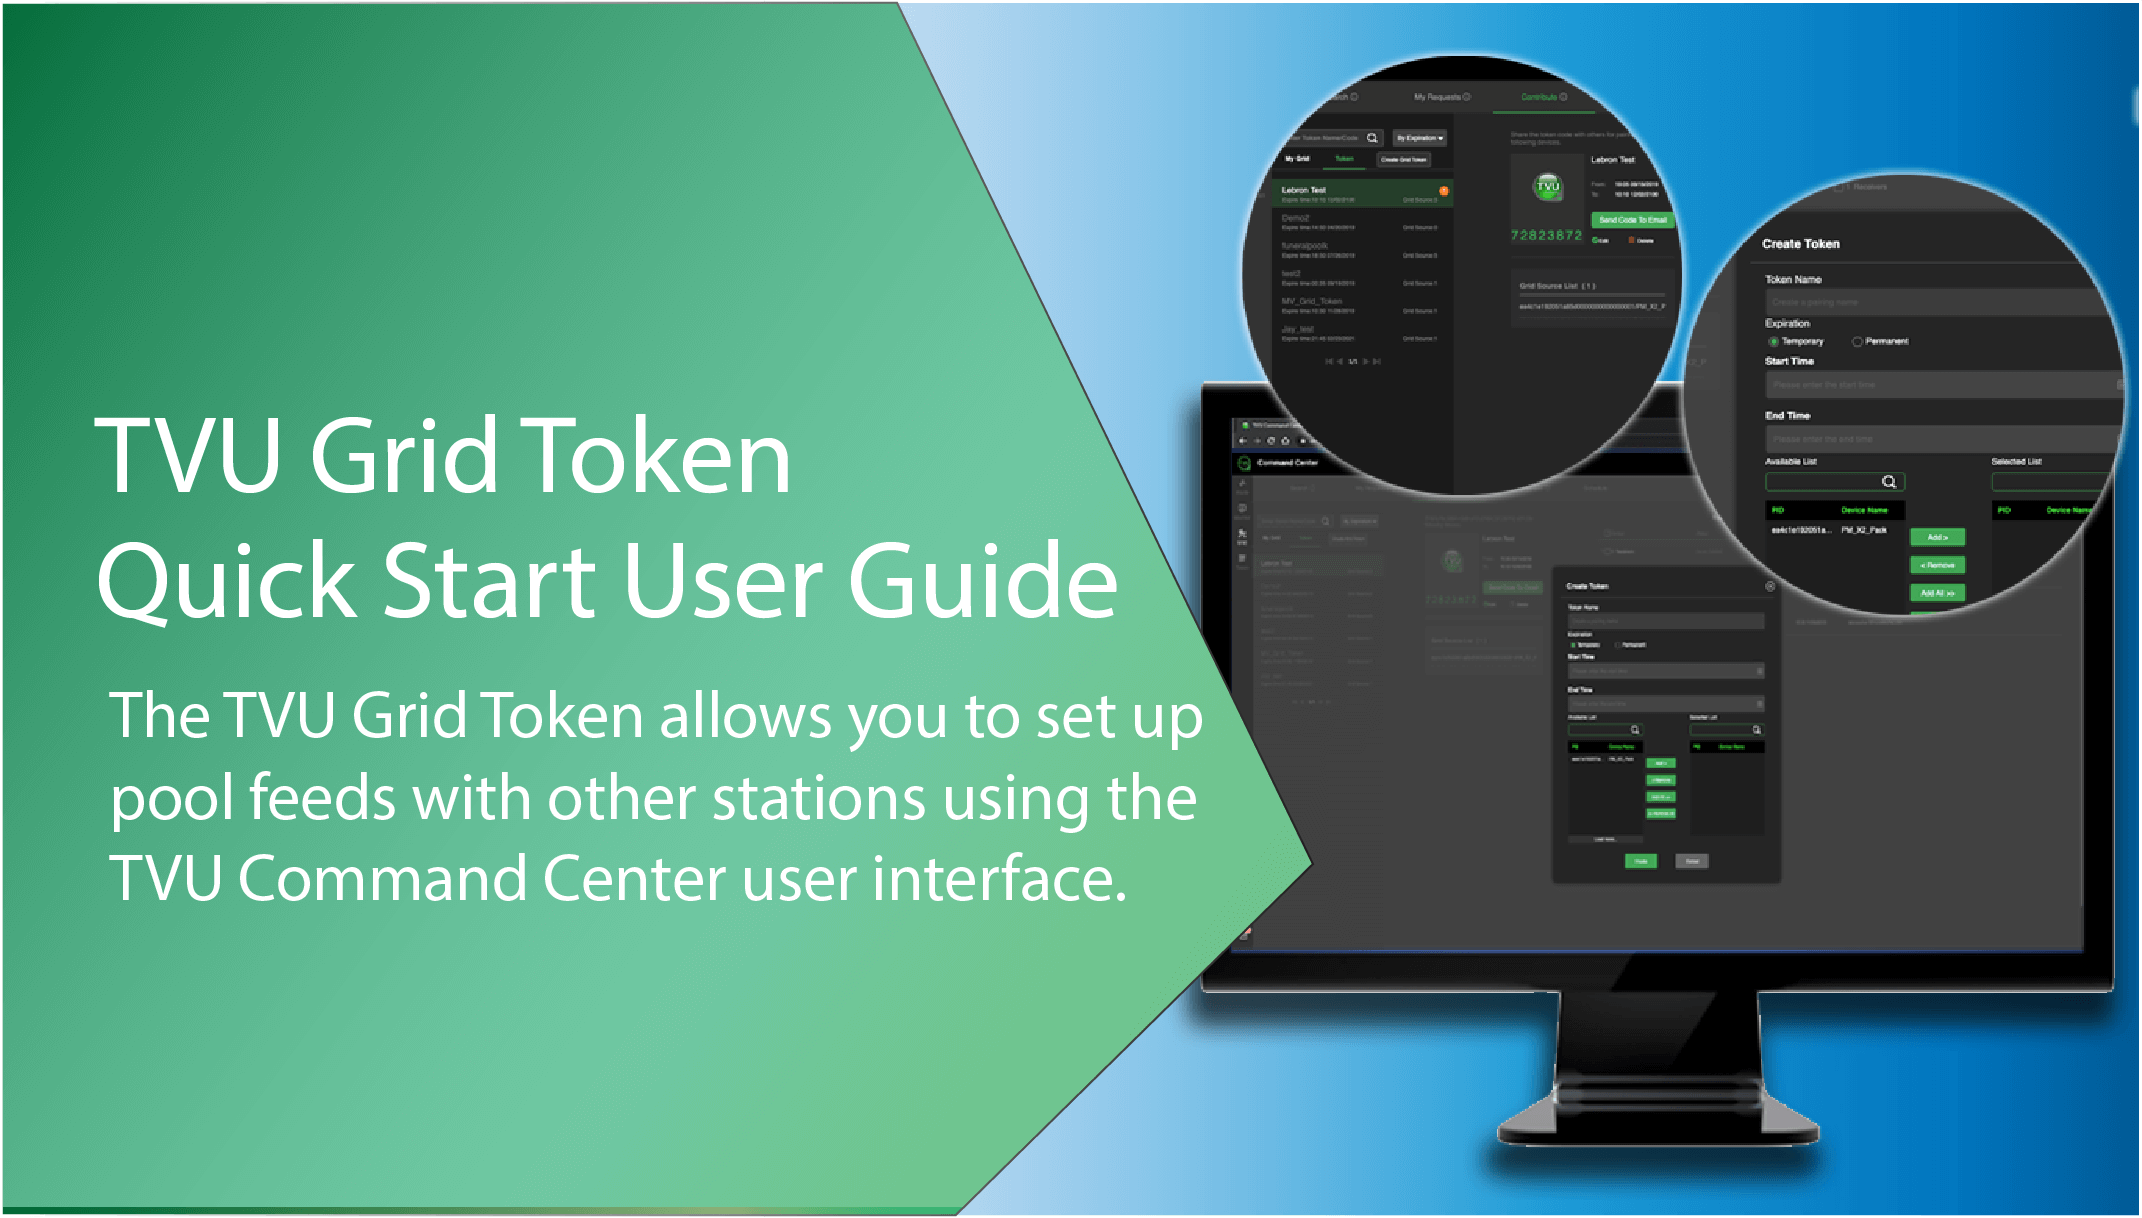
The TVU Grid Token allows you to set up pool feeds with other stations using the TVU Command Center user interface.
Introduction, setup, and operation
This Quick Start guide provides instructions to complete the following tasks:
- Activating the TVU Command Center token feature
- Creating and sharing a Grid token
- Editing Token information
- Pairing the Grid source tokens
- Recipient request for Token acceptance
- Grid source owner – Accepting a token request using the Command Center UI
- Editing device information
- Delete or Deny a Token
Product overview
The Grid token is a feature accessible within the TVU Command Center User Interface (UI). The TVU Grid Token feature allows an operator to perform automatic Grid source pairing without the intervention of TVU Support. To use the token feature requires a Grid token license activation from TVU Support.
Contents and features
TVU Grid Token and Grid tab features
- Self-service administration – Users can create a Grid Token and Grid source pairing.
- Define a single token for a single user – The Grid token feature allows an operator to create a single Grid source token defined by date and time for a TVU user.
- Define a single token for multiple users – The Grid token feature allows an operator to create a single Grid source token defined by date and time for multiple users.
- Send code to email feature – The token feature allows an operator to send a token code to an email address from the Command Center console for remote usage.
- Administrative features – A user can accept, reject, or deny access to a token request.
TVU Grid Tab features
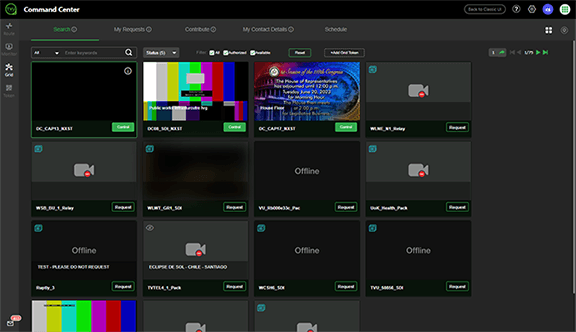
The Command Center UI’s main navigation Grid tab contains four sub-category tabs. The tabs and their functions are as follows:
Search tab:
- Check the Authorized filter box to view, find, and control Grid sources you can access.
- Check the Available filter box to find and request access to visible Grid sources you do not already have access to.
- Toggle between a thumbnail or map view to locate authorized and available Grid sources.
- Filter your keyword search by name, location, affiliation, and group.
- Add Grid sources using a Grid Token code.
My Requests tab:
- View all of your Direct Requests and Token Access requests.
- Control Grid sources you have been granted access to via Direct Request and Grid Token.
- Manage your Direct Requests and Grid Token access request.
- Add Grid sources using a Grid Token code.
Contribute tab:
- Manage how your Grid sources appear to others while searching for content.
- Create Grid Token codes to share access to your Grid sources.
- Manage access to your Grid sources using the Direct Request and Grid Token requests.
My Contact Details tab:
- Configure your contact details to communicate efficiently with others and receive activity notifications.
Schedule tab:
- Allows users to create a Grid source schedule by Month, Week, or Day. Import a source event schedule from your local drive and download your slug information to your local drive.
Before you begin
Contact TVU Support at support@tvunetworks.com to activate your account’s TVU Command Center token feature. There are two token features available:
- Grid token
- TVU Anywhere token – Refer to the “TVU Anywhere Token Quick Start User Guide” for detailed information.
Activating the TVU Command Center Grid token feature
Activating the token feature allows an operator to create a token with a Grid source to pair registered receivers using the Command Center UI.
Sign in to Command Center
To Sign in to Command Center, complete the following procedure:
- Launch Command Center and authenticate your account; Enter your Email and Password or use an SSO method.
- Click Sign In.
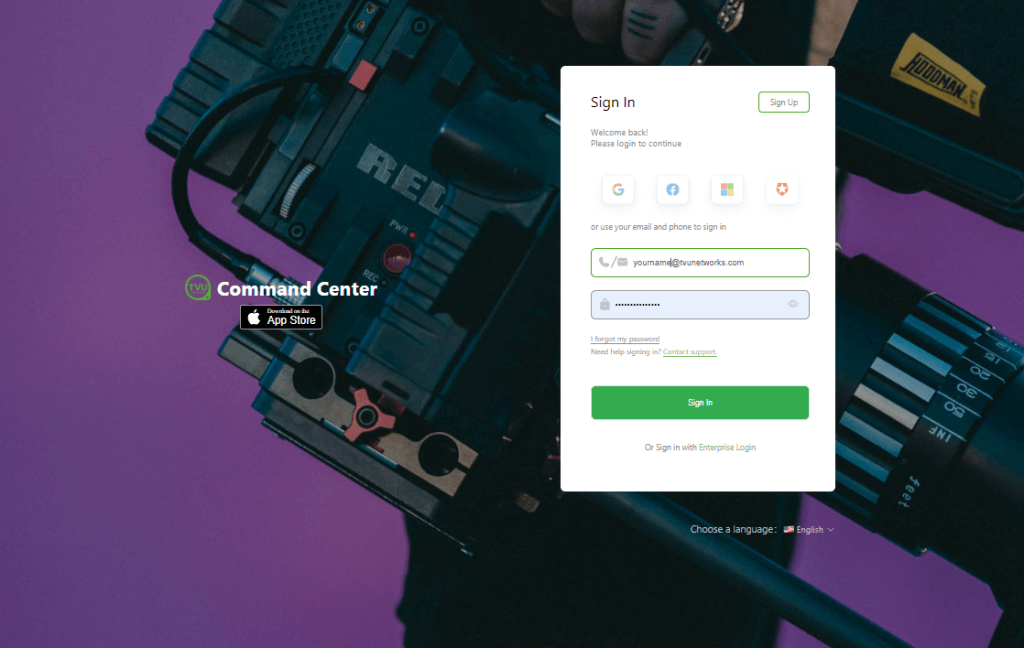
The Command Center UI displays.
Creating a Grid token:
The Grid > Contribute tab allows you to create Grid Tokens, manage access to your Grid sources, and perform the following tasks:
- Create Grid Tokens for Grid sources.
- Name the Token.
- Configure the Token’s temporary start and end time or make it permanently available.
- Add any number of your Grid sources to a Token.
- Send Token Code Email notifications.
Manage Grid Token Requests from other users:
- Accept requests to add your Grid Token’s Grid sources to other receivers.
- Deny requests to add your Grid Token’s Grid sources to the receivers.
- Delete requests.
Grid Source owner:
Before you begin, contact TVU Support to give you ownership of your sources.
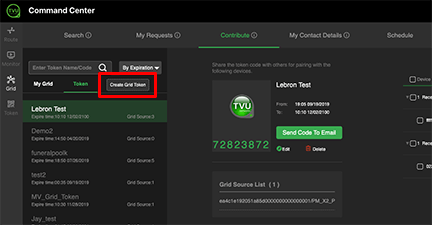
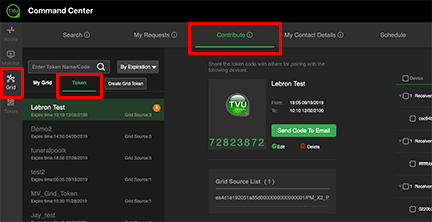
To create a TVU Grid token, complete the following steps:
- Click the Grid tab in the left main navigation pane.

- Click the Contribute tab.

- Click the Token tertiary tab to display the Create Grid Token button.
- Click Create Grid Token.
The Create Token pop-up window displays.
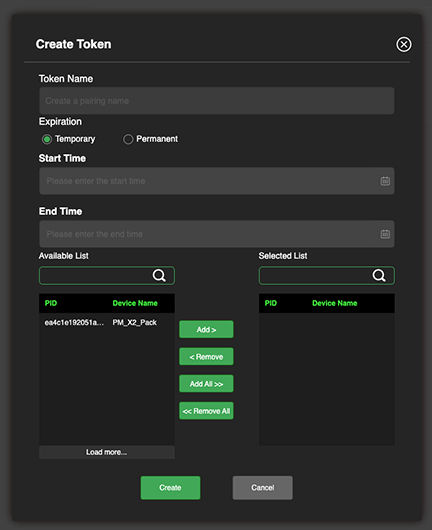
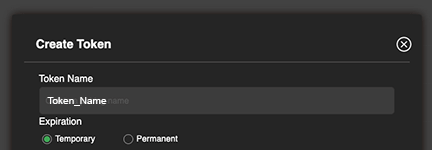
- In the token Name field, Enter a Token Name.
- Choose a Permanent or Temporary expiration setting. If you select Permanent, you will continue with step 13. If you select Temporary, continue to step 7.
- To set the token Start Time, click the Calendar icon in the Start Time field.
- Select a month and year from the pop-up calendar. Then, select a date.
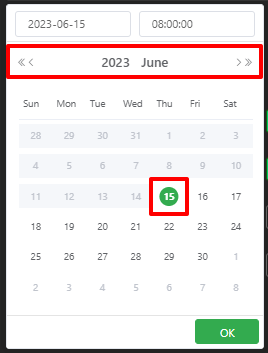
- In the right field, enter a start time from the pop-up window and click OK.
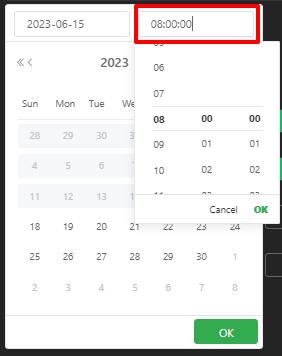
- To set the token End Time, click the End Time field. Select a date.
- Select an expiration time from the pop-up calendar.
- Click OK.
- If your source does not display in the Available List, place your cursor into the “Grid Source List” search field and Enter the Grid source name/PID, or enter the first 4 digits of the PID and click the Search icon to select the available receiver.
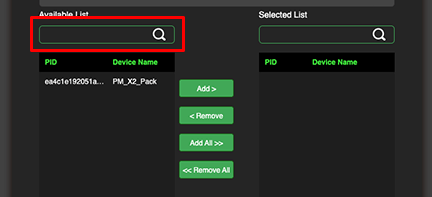
- Click to highlight the Grid source name/PID in the Available List and click the Add> button.
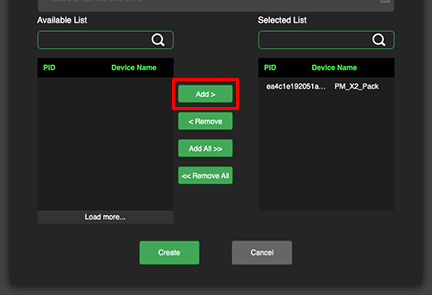
Note: You may add more than one available grid source to your list from the Create token pop-up window if desired by repeating steps 4 through 13.
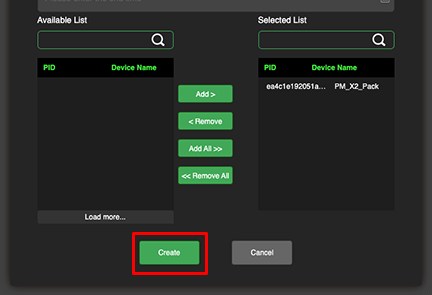
- The source(s) is now added to the “Selected list” as a new token. Click the Create button to save your changes and close the window.
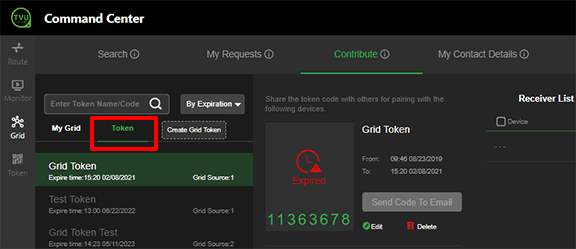
The Token tab displays your new token information. Your list of tokens display in the left panel below the token tab.
The token code displays under the TVU logo. The token Name and Expiration Time settings display next to the token code.
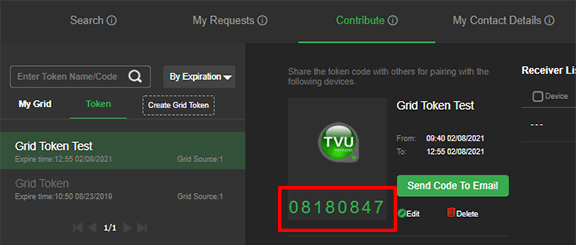
- Verify that the information is correct. To edit the token information, continue to “Editing a token.” Otherwise, Continue with “Pairing the Grid source tokens.”
Editing a Token
To edit the token information, complete the following steps:
- To delete the token, click the red Delete icon and confirm your action.
- To edit the token information, click the green Edit icon.
Note: Users can edit existing tokens at anytime, even after the token has been accepted. Changes take effect automatically.
The Edit Token pop-up allows users to:
- Add and remove a Grid source(s)
- Delete a Grid source
- Update the token name
- Update the token expiration date and time
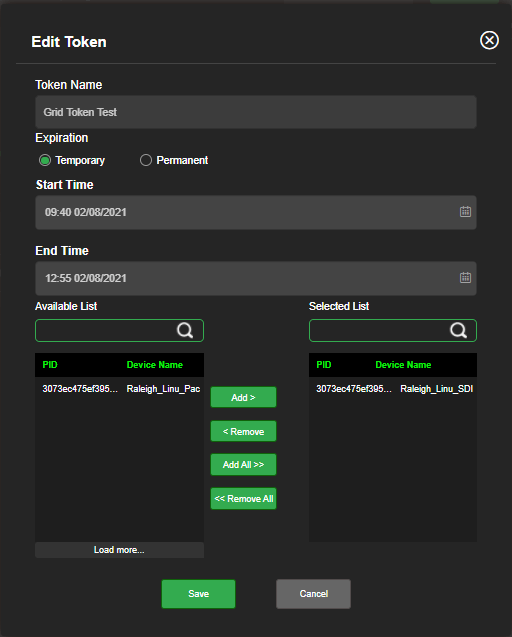
- Complete your edits and click Save. Then, close the pop-up window.
Pairing Grid source tokens
Complete the following steps to share a token code with others and for pairing Grid sources. The Grid source must be available to select from the Token tab list:
- Click the Grid tab in the main left navigation panel.
The token Search page displays.
- Click the Contribute tab. Then, click the Token tab to display the Grid sources.
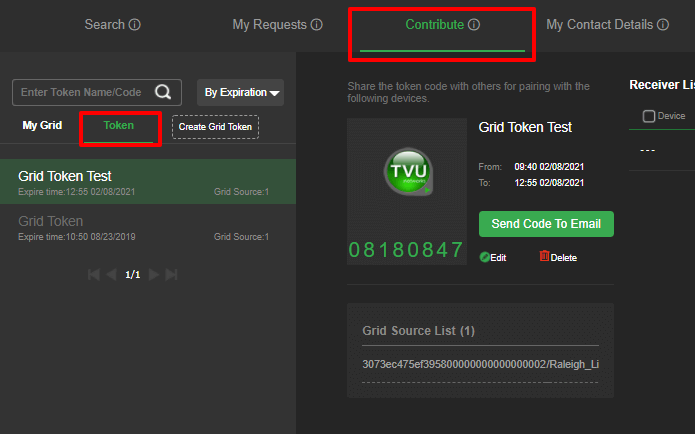
The token code displays under the TVU logo.

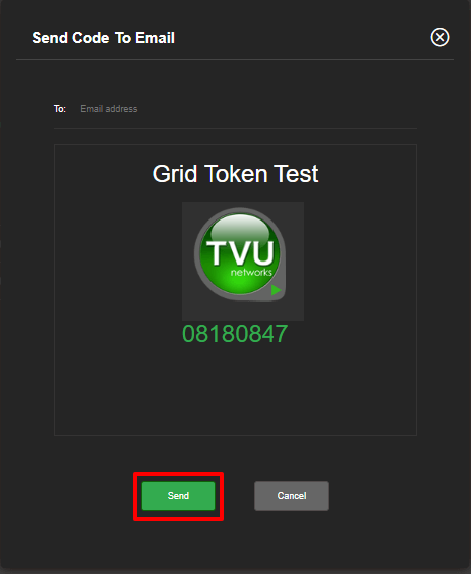
- Click the Send code to email button. The email window opens. Enter the user’s email address in the “To” field, enter any message in the email text field if desired, and click Send.
User request for token acceptance
To request access to the token, complete the following steps:
- The user will receive the token code from the token owner via email.
- Open Command Center and click the Route tab. Then, click the plus “+” icon to add an external source.
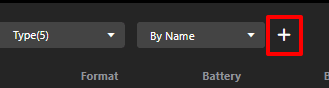
The Add External Source dialog displays.
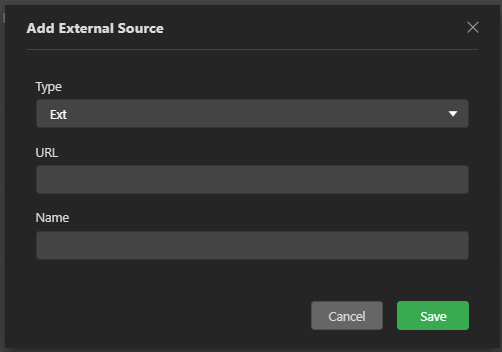
- Select the Grid Token from the “Type” drop-down menu. Enter the token code you received in the Token Code field.
- Enter a name to identify yourself in the “Introduce yourself” field.
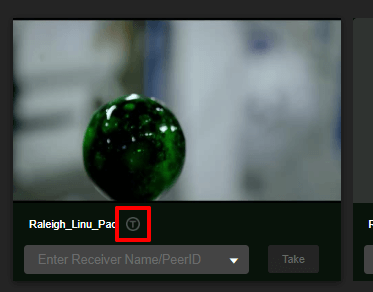
- Click the ”Select which receivers …” field, and choose the receiver(s) you want to pair to from the drop-down menu selections.

- Click Save.
Grid source owner – Accepting the Token request
Before the Grid source can go live, The token owner must then “Accept” the token in the device list. To perform this function, complete the following steps:
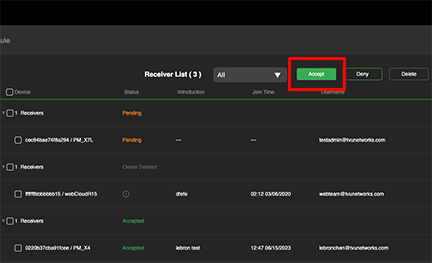
- Click the Command Center Grid tab and the Contribute tab. Then, click Token in the left panel.
The device panel displays a list of devices from the user in “Pending” status. An orange bubble ![]() displays in the left panel to indicate a pending request notification.
displays in the left panel to indicate a pending request notification.
- Select the receiver(s) you want to accept. Then, click the Accept button to accept the token. Additionally, you also have the option to delete or deny a token.
After the access request is received, the Grid source owner can manage the access request from the Command Center Grid tab.
After the request is accepted, the recipient can go Live with the Grid Token source (during the Token valid time period set by the administrator).
Token viewing after acceptance
After the token is accepted, the user can view the source(s) in the Route > Sources tab.
A token source will display a “T” symbol below the source preview.
TVU Networks® Corporation, © Copyright 2023. All rights reserved in all media
Document Part Number: TVU Grid Token QSUG Rev C EN 06-2023